
Export Tender Data from CTUIT for Credit Card Verification
Pull the Tender Summary by Location and Date export from CTUIT, pivot it in Excel, and paste the tenders into the credit card verification sheet.
This guide pulls the tender data CTUIT clients need for the weekly credit card verification, then reshapes it with a pivot table so tenders can be pasted straight into the verification sheet.
Source: General Accounting/02 - Cash and Credit Card/Ctuit CCV Instructions.docx. Related SOP: Credit card and cash deposit verification.
Step 1 — Run the export
Go to the CTUIT program on your apps page and log in.
Click the Profit Builders icon, then under the Page column click Companies, and click the company name you need the export for.
- Click the menu icon in the top left corner.
- Scroll down to Exports and click it.
- Under the T's, click Tender Summary by Location and Date.
- Under Step 1, choose the location or client.
- Under Step 2, choose the period.
- Under Step 4, click Run Export.
- Click the CSV file to open it once the export generates.
- Save the file as an Excel Workbook (.xlsx).
Step 2 — Build a pivot table
Highlight all columns in the Excel file that contain data, then under Insert click the PivotTable icon.

Click OK when the dialog appears.
In the PivotTable Fields side panel, drag and drop the four fields to the appropriate boxes. The main fields you need are Location, Tender, Date, and Total.
Your field names may differ slightly from the example. Match on meaning rather than exact label.
Click the x on the PivotTable Fields panel to close it. Your data is now organized in the pivot table.
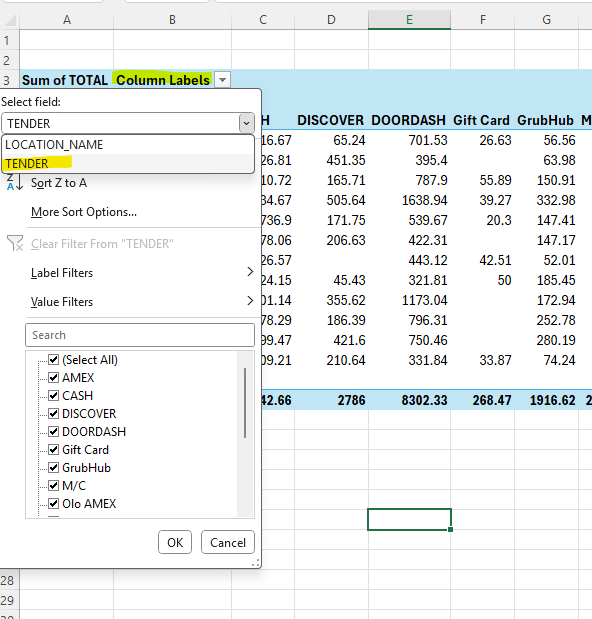
Click the dropdown by Column Labels, then select the Tender field. Select the tenders you need and deselect the ones you don't.
If you have many locations, click the Location field to select one location at a time. Click OK when done.
The tenders you need for each location are now across the top, so you can select multiple columns at once and copy (Ctrl+C) / paste (Ctrl+V) into your credit card verification sheet.
Tenders are listed in alphabetical order in the pivot table. Change the tender headings in your credit card verification sheet to match that order as closely as you can — then you can highlight and copy multiple tenders in one action instead of one at a time.
Step 3 — Match against bank activity
Finish the credit card verification by pulling bank activity and matching up the deposits.
If you download bank activity in Excel, move the credit column so it comes right after the date column. Highlight the whole column, Ctrl+X to cut, then insert/paste it after the date column. Now you can highlight the date and credit amount together and paste both at once instead of doing them separately.
Related
- Credit card and cash deposit verification — the SOP this export feeds, including variance thresholds
- Pull sales data from Touchpoint — the equivalent for Touchpoint clients
- Sales journal entry — note that CTUIT can be configured to include sales tax in gross sales