
Create a SnapLogic Project and Build a Starter Pipeline
Create a new project in SnapLogic Project Manager, then create a pipeline in Designer that is saved into that project and populated with its first Snaps. The procedure is complete when the pipeline appears on the Designer canvas under the correct project path and has been saved.
| Field | Value |
|---|---|
| Owner | Unassigned — needs an owner |
| Department | Integration Engineering |
| Effective date | Not set — pending review |
| Scope | Covers creating a project under a project space in Project Manager, creating a pipeline in Designer with the correct Label and Project values, adding Snaps from the Snaps panel, and opening a Snap's settings to set a basic property. Does not cover creating accounts or credentials, wiring and validating the full data flow, configuring a Snaplex, creating Tasks or schedules, or promoting the pipeline out of the Development project space — each of those needs its own SOP. The recording had no narration, so no business rules or naming standards are documented here; confirm your team's conventions before publishing. |
| Source | Screen recording captured 2026-08-03 via screen-to-docs |
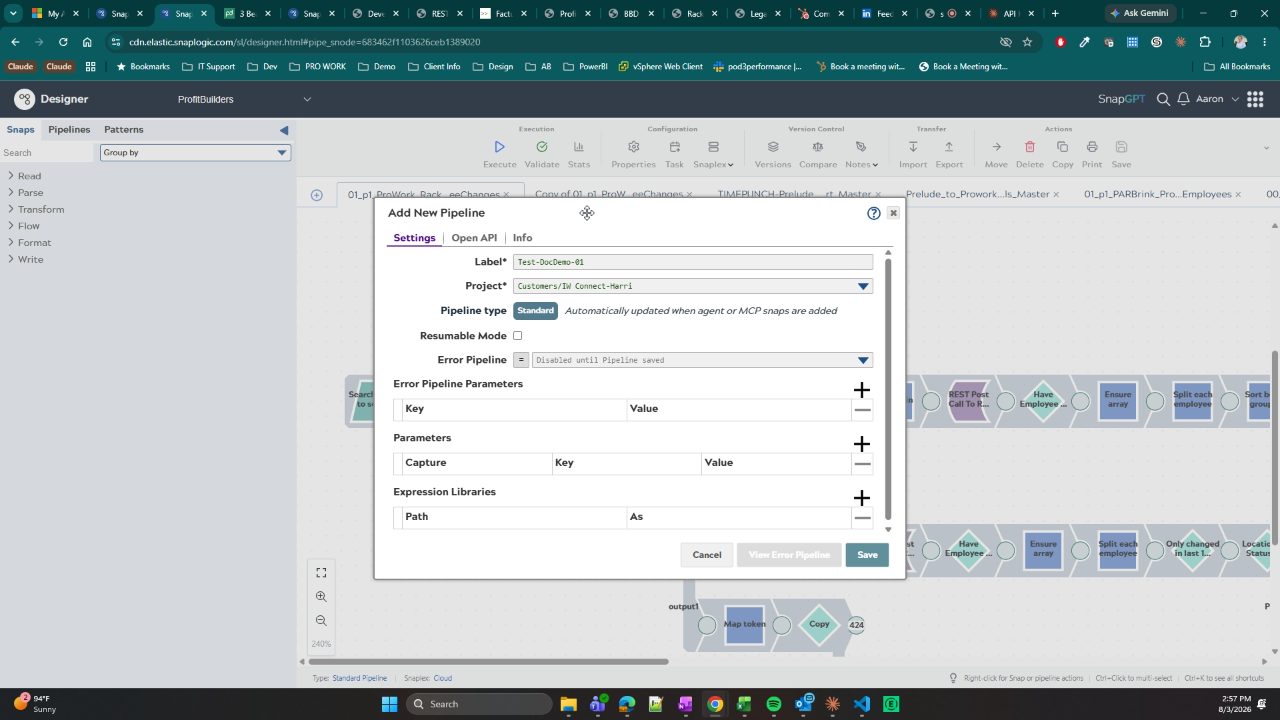
Every SnapLogic pipeline lives inside a project, and the project you pick in the Add New Pipeline dialog is what determines where the asset is stored, who finds it later, and which project space it is promoted from. The dialog defaults to whatever project was last used — in this recording it opened on Customers/IW Connect-Harri — so a pipeline created without changing that field silently lands in an unrelated customer project.
This procedure keeps the two halves in order: create the destination project first in Project Manager, then create the pipeline in Designer and point it at that project before saving. Doing it in that order means you never have to move an asset after the fact.
Procedure
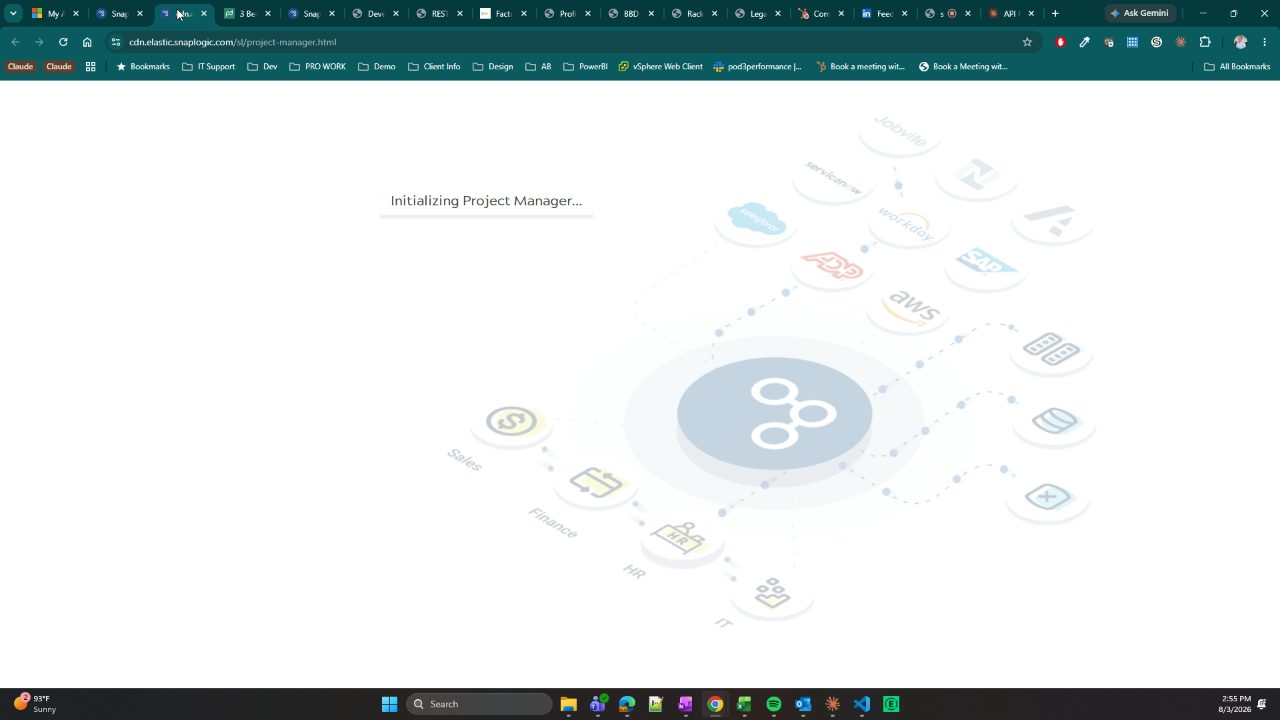
Open SnapLogic Project Manager in a browser tab. The page loads at cdn.elastic.snaplogic.com/sl/project-manager.html and shows Initializing Project Manager... while it starts.
Confirm the org name shown in the header is the one you intend to work in — in this recording it is ProfitBuilders.
In the left tree, click the project space you want to create the project under. The tree lists shared, Archive, Customers, Development, and Internal.
Select Development for work that is not yet tied to a customer delivery. The main asset list refreshes to show the contents of that project space — 39 entries of type Directory in this recording, one per child project.
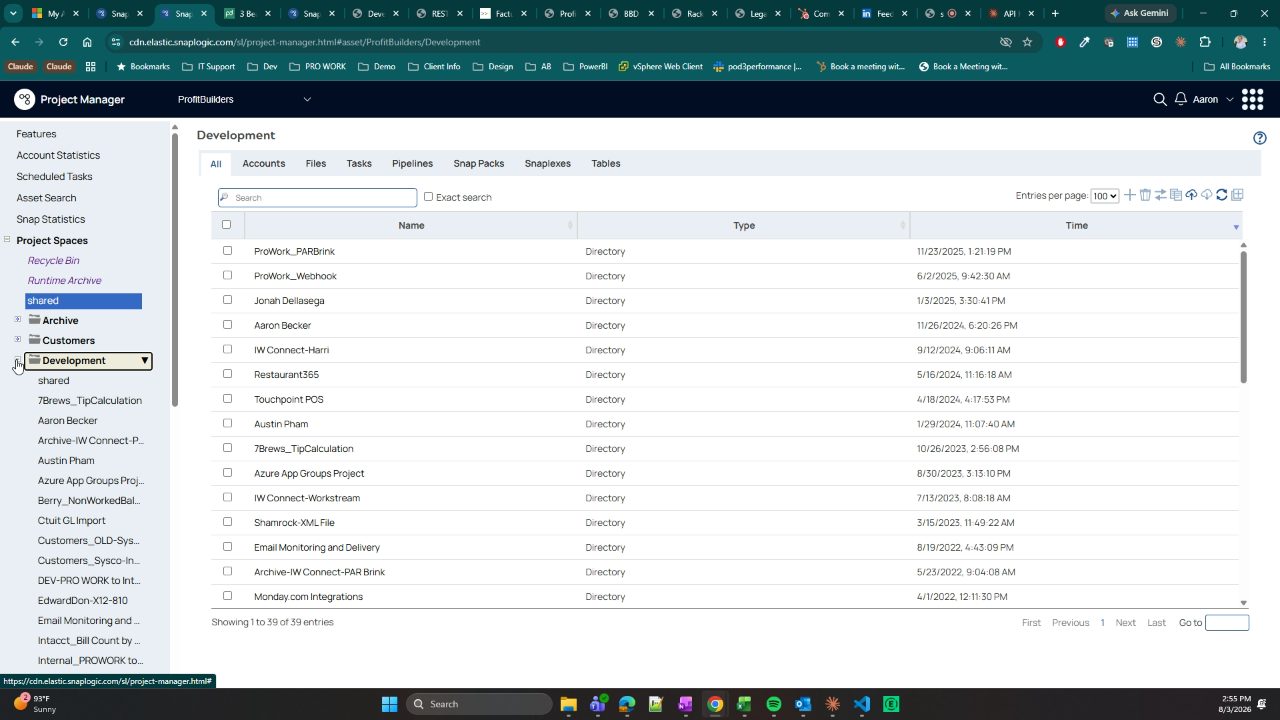
Choose the project space before creating the project. The new project is created under whatever node is selected, and moving it afterwards is a separate operation.
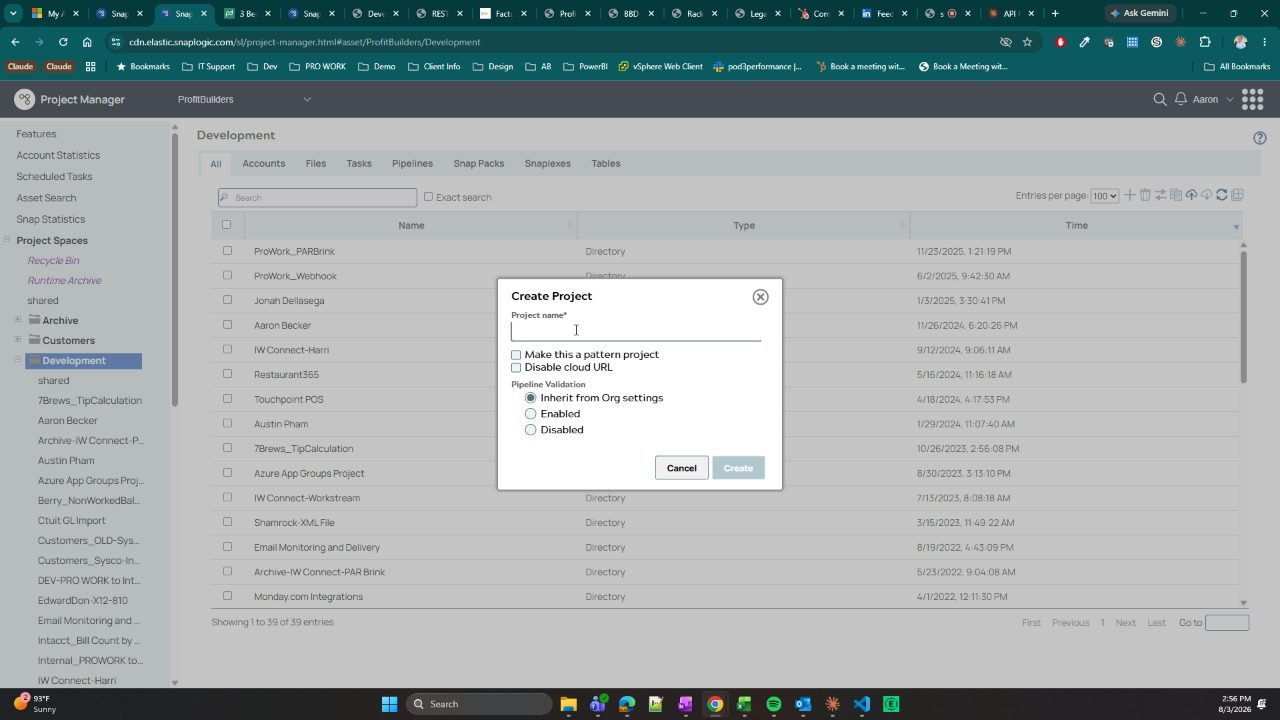
Open the Create Project dialog for the selected project space and fill it in.
- Type the project name in Project name*.
- Leave Make this a pattern project and Disable cloud URL unchecked unless you have a specific reason to change them.
- Leave Pipeline Validation on Inherit from Org settings so the project follows the org default rather than diverging.
- Click Create.
The recording shows the dialog open with the cursor in Project name* but does not show the name being typed or the Create click, and it does not show which control opens the dialog. Confirm the exact entry point and the resulting project name with an engineer before publishing.
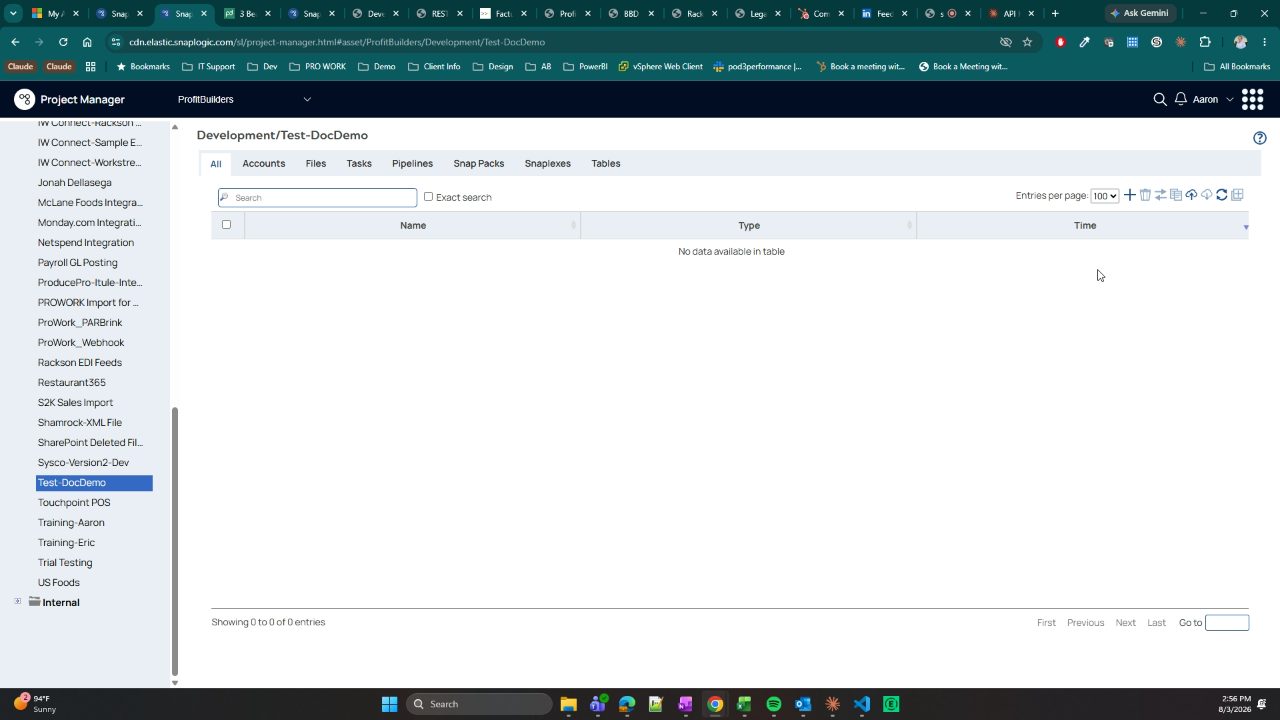
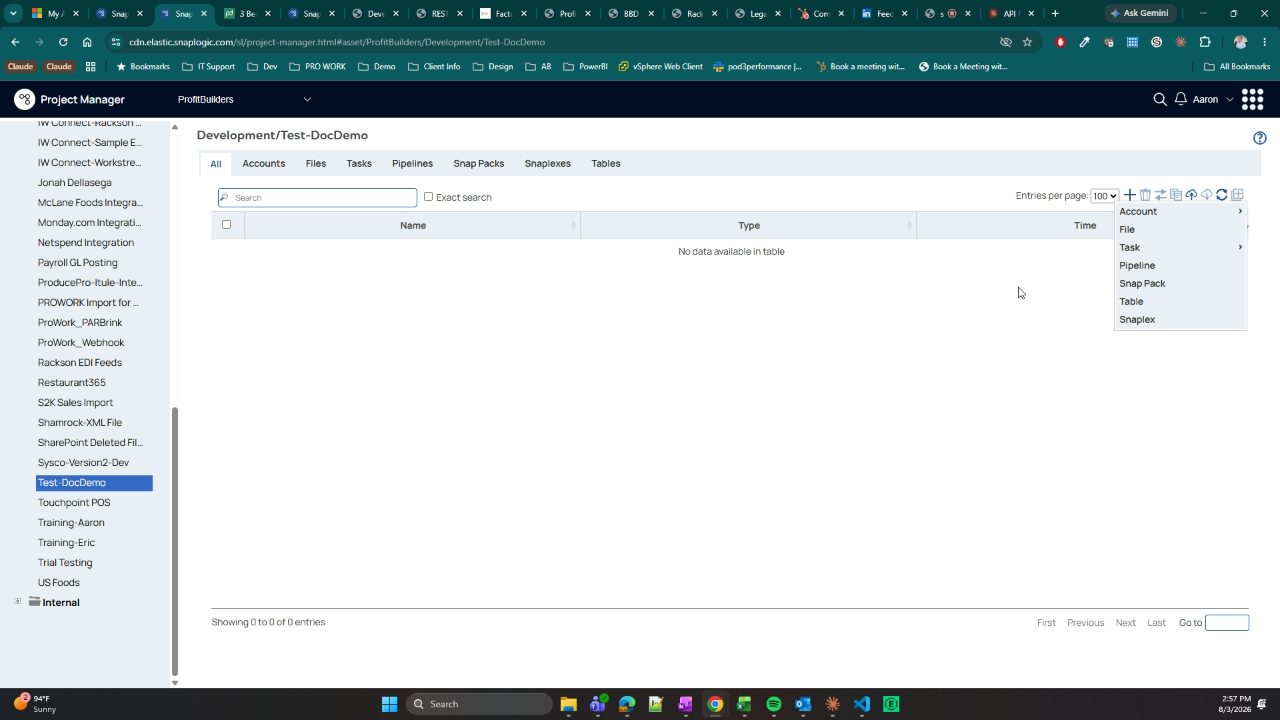
Scroll the left tree to your new project and click it. The breadcrumb should read the full path — Development/Test-DocDemo in this recording — and the asset list should read No data available in table with Showing 0 to 0 of 0 entries.
An empty list is the expected state for a project you just created. If assets appear, you have selected the wrong project.
With the project selected, the + button in the asset toolbar opens a menu of asset types: Account, File, Task, Pipeline, Snap Pack, Table, and Snaplex.
You can create a pipeline from here, but the remaining steps build it in Designer instead, because Designer opens the new pipeline directly on a canvas where you can start dropping Snaps.
Switch to the Designer tab for the same org. Existing pipeline tabs stay open along the top of the canvas.
Click the + button to the left of the tab strip to open the Add New Pipeline dialog.
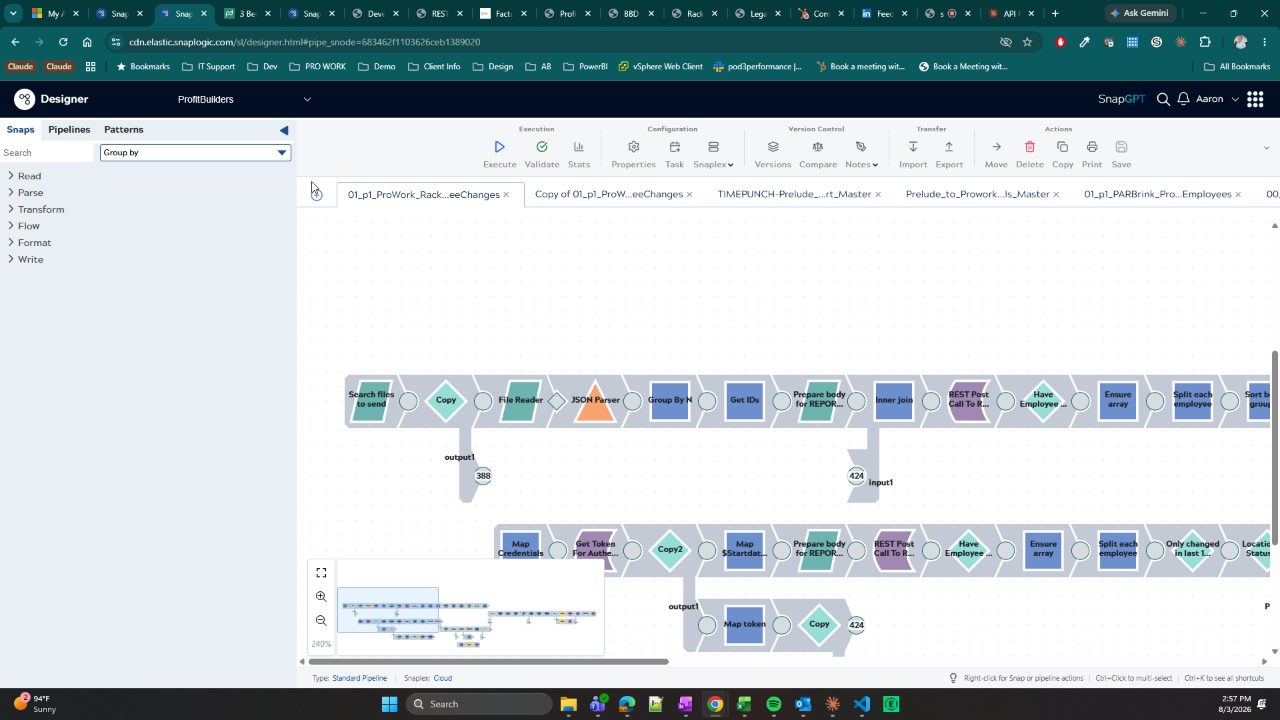
Hovering a pipeline tab shows the asset's full path, which is a quick way to confirm which project an open pipeline belongs to.
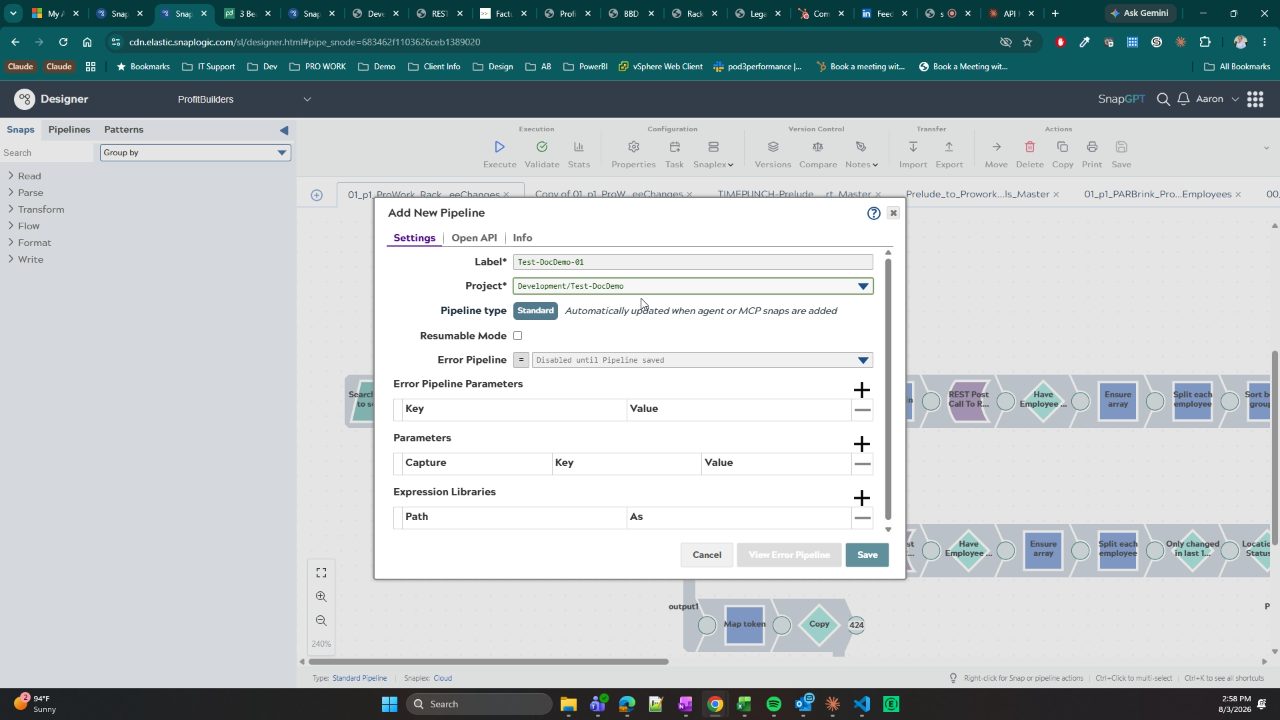
On the Settings tab of the Add New Pipeline dialog, clear the default label and type your pipeline name in Label*. The recording uses Test-DocDemo-01.
Leave Pipeline type as Standard. Error Pipeline stays greyed out with the note Disabled until Pipeline saved, so you cannot attach one until after the first save.
Open the Project* dropdown. It opens on the last-used project — Customers/IW Connect-Harri in this recording — not on your new one.
- Scroll the tree past shared, Archive, Customers, and into Development.
- Click your project, for example Test-DocDemo.
- Confirm Project* now reads the full path, such as
Development/Test-DocDemo.
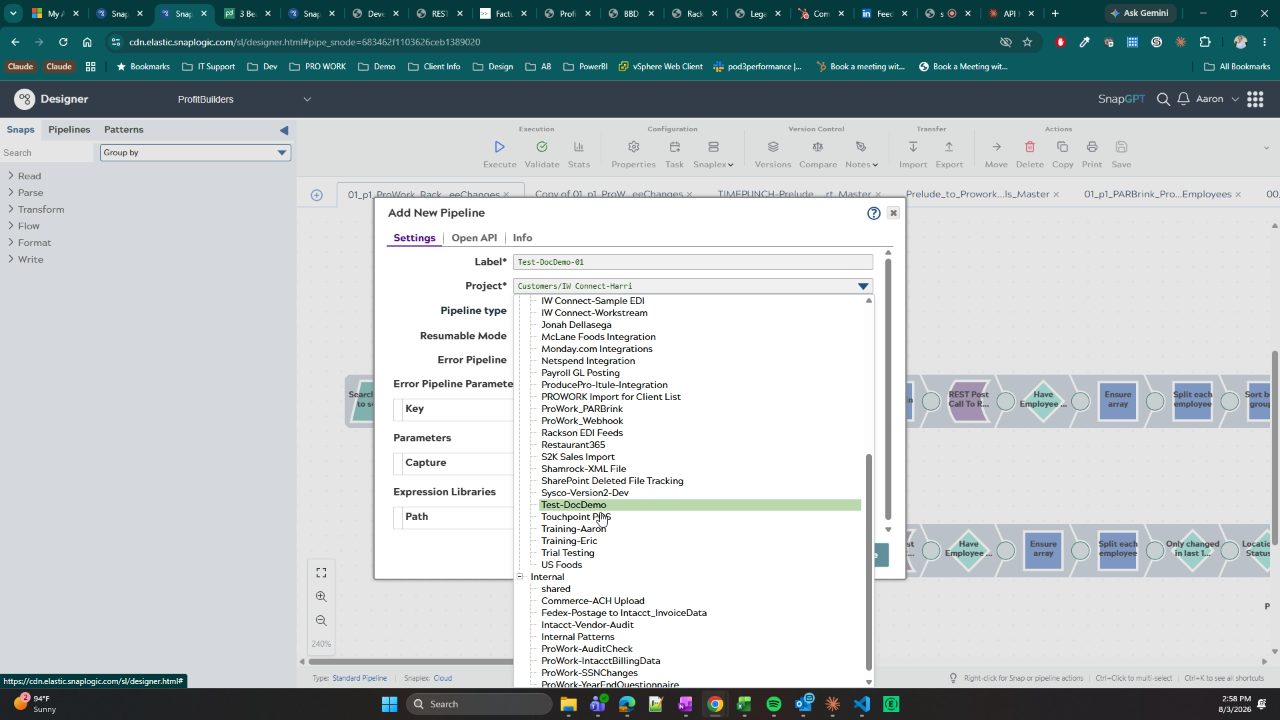
Do not accept the pre-filled Project value. Saving with the default writes the pipeline into an unrelated customer project, and it then has to be moved with the Move action before anyone can find it where they expect.
Check that Label* and Project* both read what you intend, then click Save.
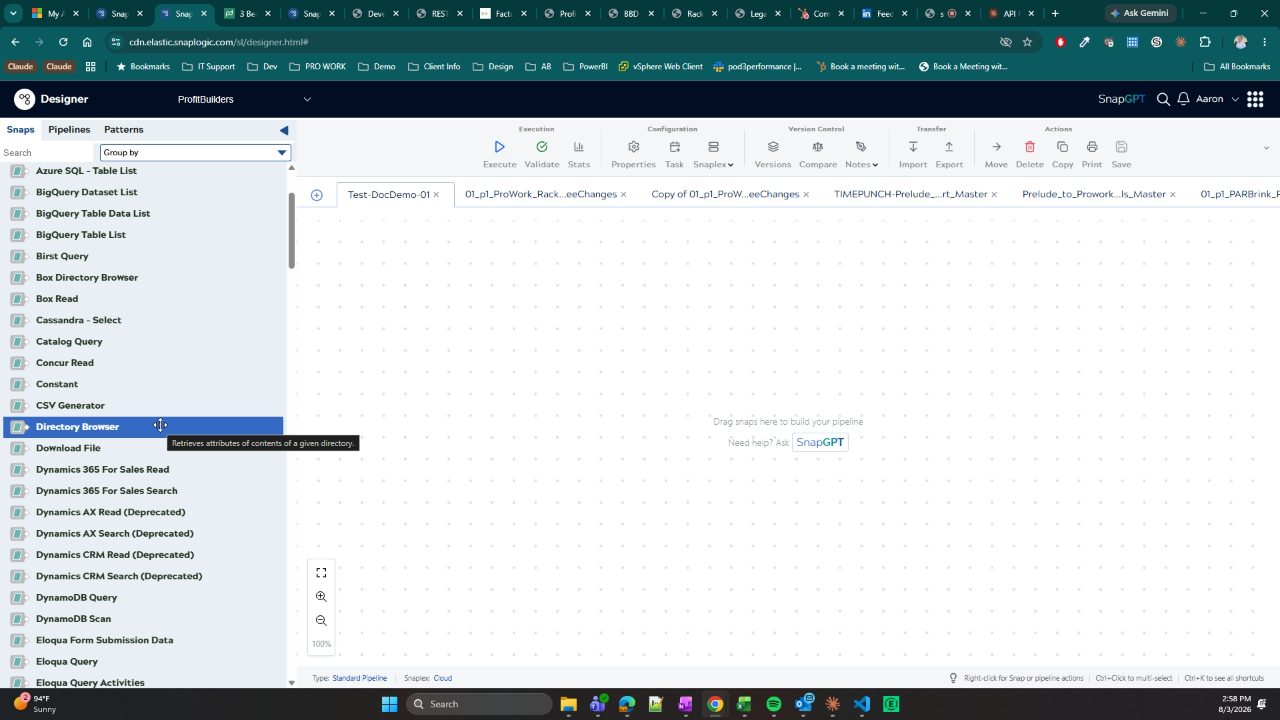
The dialog closes and a new tab opens — shown as Test-DocDemo-01 *. The canvas reads Drag snaps here to build your pipeline, and the footer shows Type: Standard Pipeline and Snaplex: Cloud.
The asterisk after the tab name means the pipeline has unsaved changes on the canvas. It stays until you click Save under Actions.
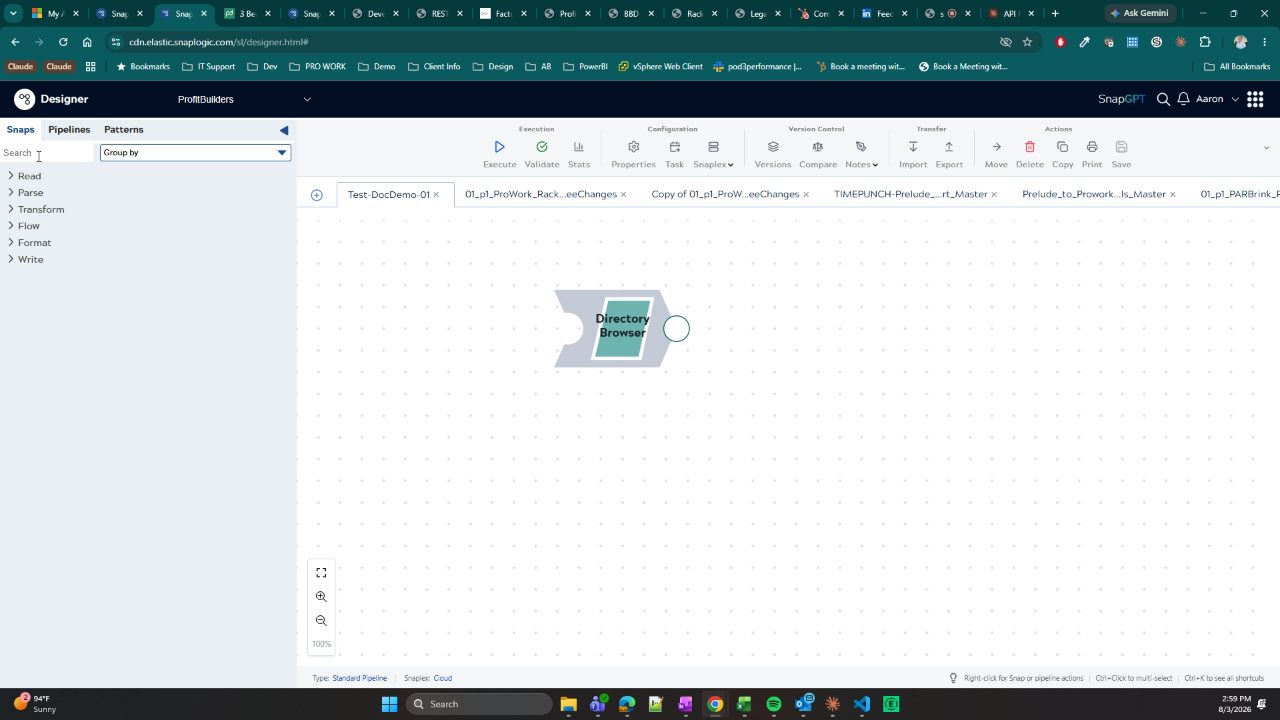
In the left Snaps panel, click the Read category to expand it, then drag the Snap you need onto the canvas.
This recording uses Directory Browser, whose tooltip reads Retrieves attributes of contents of a given directory. Hovering a Snap before dragging shows its one-line description, which is the fastest way to tell similar Snaps apart.
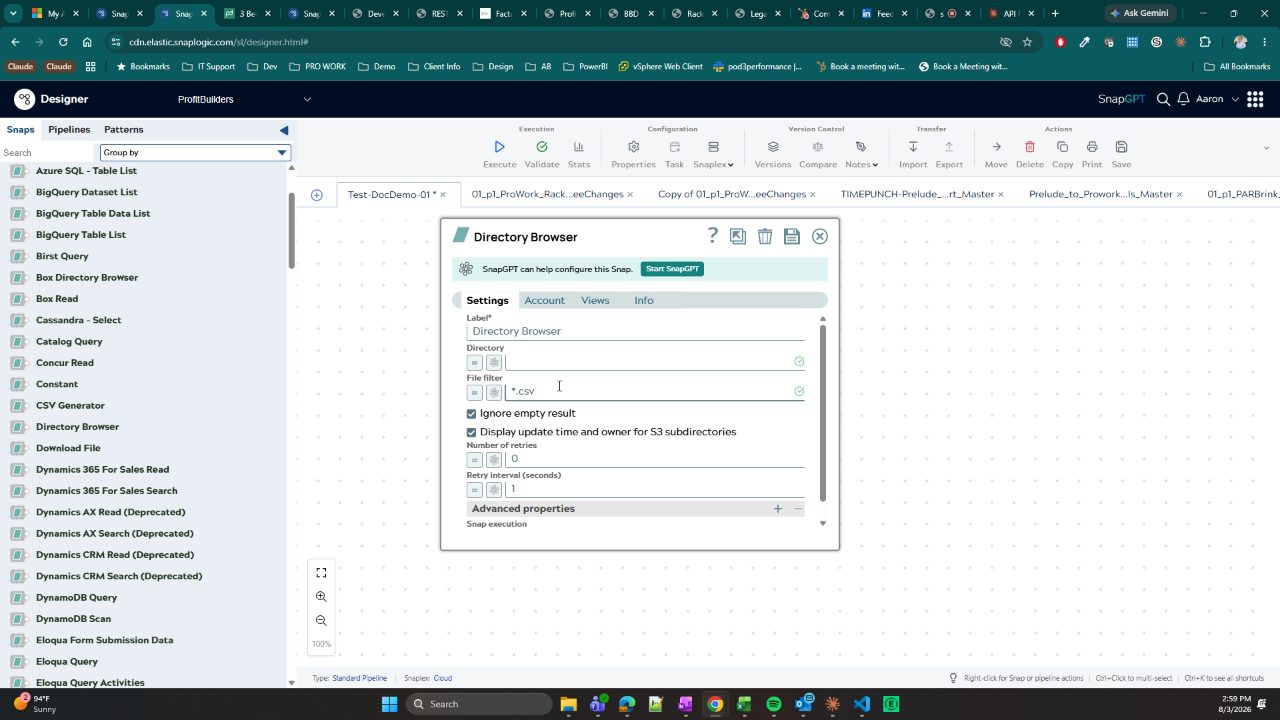
Open the Snap on the canvas to show its configuration dialog. For Directory Browser the Settings tab exposes Label*, Directory, File filter, Ignore empty result, Display update time and owner for S3 subdirectories, Number of retries (default 0), and Retry interval (seconds) (default 1). Separate Account, Views, and Info tabs sit alongside Settings.
Set File filter to the pattern you want to match — the recording corrects it to *.csv. Close the dialog with the save control in its header when the fields are correct.
The recording leaves Directory empty and does not show a value being entered, so the directory path this Snap should point at is not documented here. Confirm it before publishing.
A Snap dropped on the canvas is not validated until it is configured and the pipeline is validated or executed. A green check beside a field only means that field parses, not that the path exists.
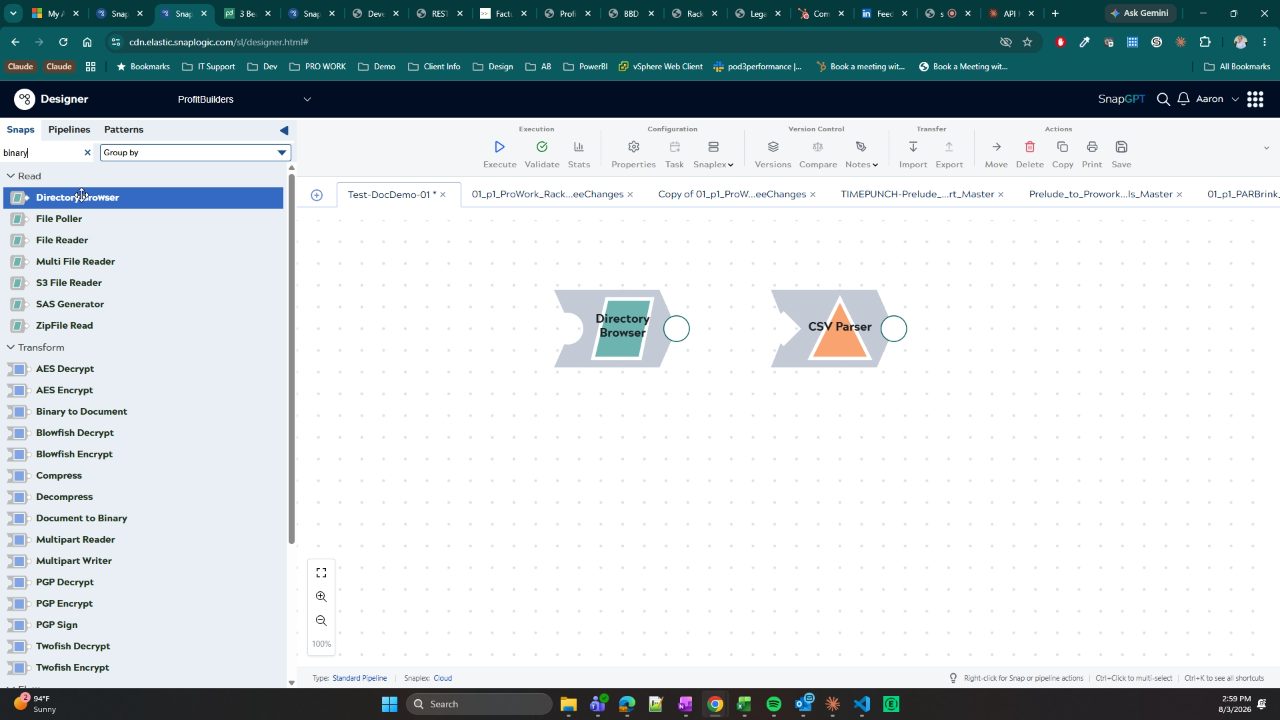
Rather than scrolling the category lists, type a keyword into the Search box at the top of the Snaps panel. The results stay grouped by category, so searching binary returns Read Snaps such as File Reader and S3 File Reader alongside Transform Snaps such as Binary to Document and Document to Binary.
Drag each Snap you need onto the canvas. This recording ends with three Snaps in sequence: Directory Browser, Document to Binary, and CSV Parser.
The recording does not show the output-to-input connections being drawn between these Snaps, and it does not establish why this particular combination was chosen. Treat the Snap list as an example, not as a required pattern.
You can collapse the expanded category back to the six top-level groups — Read, Parse, Transform, Flow, Format, Write — to get the panel back to a scannable size.
Click Save under Actions in the right-hand toolbar. The asterisk should disappear from the pipeline tab, leaving Test-DocDemo-01.
To verify the asset landed correctly, return to Project Manager, select the project, and confirm the pipeline now appears in the asset list where the table previously read No data available in table.
The recording does not show this save or the verification, so treat this as the required closing step rather than an observed one.
An unsaved pipeline exists only in the browser session. Closing the tab before saving discards the Snaps and their configuration.