---
title: "Reconcile a Bank Account in Restaurant365"
sidebarTitle: "R365 bank rec"
description: "The two-part R365 reconciliation — clearing the bank activity screen with rules and matching, then completing and approving the reconciliation."
icon: "utensils"
---
> **For AI agents:** the complete documentation index is at [llms.txt](/llms.txt). Append `.md` to any page URL for its markdown version.
| Field | Value |
|---|---|
| **Owner** | Unassigned — needs an owner |
| **Department** | General Accounting |
| **Effective date** | Not set in source |
| **Scope** | Performing a bank reconciliation in Restaurant365, covering both the bank activity screen and the reconciliation screen. Assumes familiarity with [bank reconciliation concepts](/internal/sops/accounting/general/bank-reconciliation-concepts). |
| **Source** | `General Accounting/02 - Bank Reconciliation/R365 Bank Reconciliation.docx` |
Reconciliation in R365 happens in two parts:
1. **Bank activity** — connects to the bank account, imports transactions, matches them to posted R365 transactions, and lets you create transactions directly.
2. **Bank reconciliation** — review transactions matched in bank activity, outstanding items, and the reconciliation summary.
**Clear all activity from the bank activity screen for the period before starting the reconciliation.** Do not open a bank reconciliation before this step.
## Part 1 — Bank activity
Access it from the application bar: **Banking → Get bank activity**.
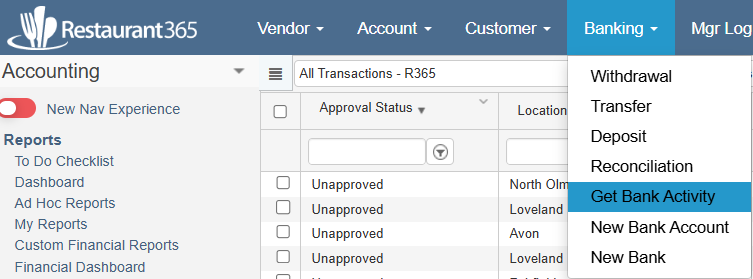 Bank activity displays bank data uploaded through a direct bank connection or manual import. **This data is not GL-impacting until it is matched to a transaction in R365.** From here you can manage bank connections, import bank files, manage rules, export bank data, and match transactions.
### The four tabs
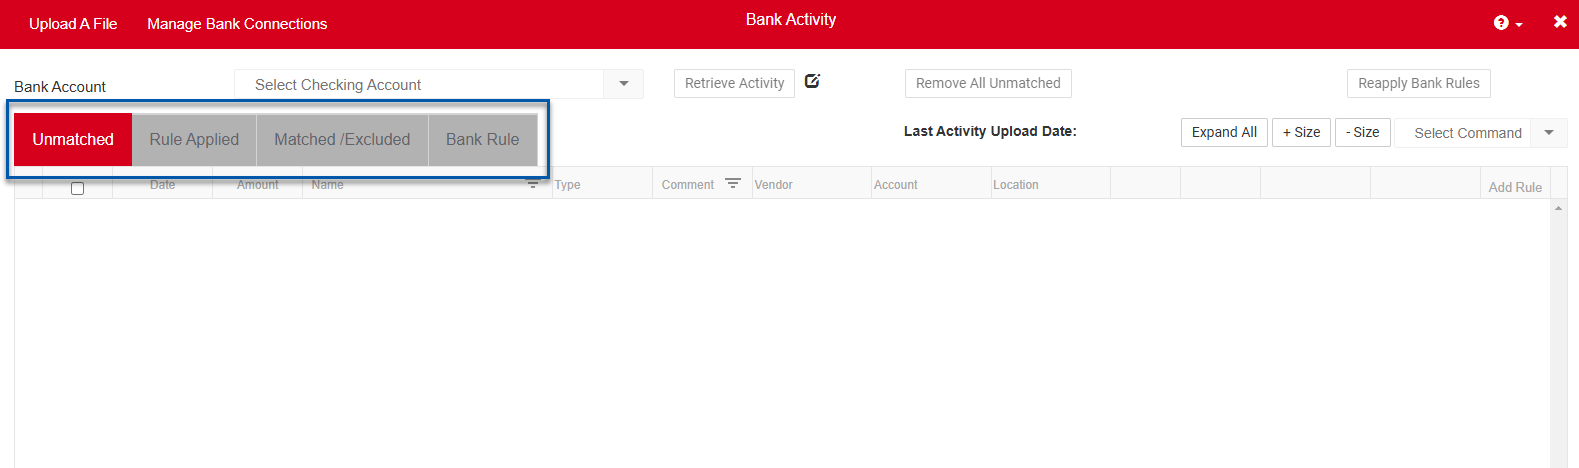
On upload, R365 applies auto-matching logic and moves transactions into tabs:
| Tab | Contains |
|---|---|
| **Unmatched** | Transactions that don't match existing records, don't meet rule criteria, or have multiple potential matches. Use this as your checklist. |
| **Rule Applied** | Transactions that met rule criteria, staged for review |
| **Matched/Excluded** | Transactions matched to existing R365 records, plus anything excluded |
| **Bank Rule** | Rule management — **only visible if Rule Vault is not enabled** in System Preferences. When Rule Vault is enabled, it replaces this tab with an option in the top ribbon. |
Bank activity displays bank data uploaded through a direct bank connection or manual import. **This data is not GL-impacting until it is matched to a transaction in R365.** From here you can manage bank connections, import bank files, manage rules, export bank data, and match transactions.
### The four tabs
On upload, R365 applies auto-matching logic and moves transactions into tabs:
| Tab | Contains |
|---|---|
| **Unmatched** | Transactions that don't match existing records, don't meet rule criteria, or have multiple potential matches. Use this as your checklist. |
| **Rule Applied** | Transactions that met rule criteria, staged for review |
| **Matched/Excluded** | Transactions matched to existing R365 records, plus anything excluded |
| **Bank Rule** | Rule management — **only visible if Rule Vault is not enabled** in System Preferences. When Rule Vault is enabled, it replaces this tab with an option in the top ribbon. |
 Matched transactions are automatically selected during reconciliation, so you can begin reconciling once all activity has been addressed.
### Review and apply bank rules
If bank rules are set up and uploaded transactions match them, R365 recommends applying the rules. The **Rule Applied** tab is where you review these, and it shows the vendor, account, and location that will be assigned.
Matched transactions are automatically selected during reconciliation, so you can begin reconciling once all activity has been addressed.
### Review and apply bank rules
If bank rules are set up and uploaded transactions match them, R365 recommends applying the rules. The **Rule Applied** tab is where you review these, and it shows the vendor, account, and location that will be assigned.
 Review each record and change the vendor, account, or location as needed, then add them to Matched/Excluded:
- **Individually** — click **Add** in the Add column for the row.
- **In bulk** — select the checkboxes (or the Select All header checkbox) and choose **Add Selected** from the Select Command dropdown.
A transaction is created for each selected row, and the rows move to Matched/Excluded with the applied rule shown in the rule applied column.
### Manage bank rules
Bank rules are managed on the **Bank Rules** tab, or via **Rule Vault** in the top ribbon if enabled. Rules let R365 attempt to assign a vendor, account, or location to imported bank activity based on set conditions.
**Create bank rules for deposits and bank fees only. Do not create rules for vendor payments** — all vendor payments must be recorded through an invoice or manual payment.
To create a rule, select the **Add Rule** checkbox on an activity row where the vendor, account, or location fields are populated, then select **Add** or **Bulk Add**. If a rule needs deleting, contact the accounting manager for the client.
### Exclude transactions
Transactions that aren't needed should be **excluded, not deleted** — excluding prevents them from reimporting later.
Select the transactions, choose **Exclude Selected** from the Select Command dropdown, and click **Save Changes**.
Review each record and change the vendor, account, or location as needed, then add them to Matched/Excluded:
- **Individually** — click **Add** in the Add column for the row.
- **In bulk** — select the checkboxes (or the Select All header checkbox) and choose **Add Selected** from the Select Command dropdown.
A transaction is created for each selected row, and the rows move to Matched/Excluded with the applied rule shown in the rule applied column.
### Manage bank rules
Bank rules are managed on the **Bank Rules** tab, or via **Rule Vault** in the top ribbon if enabled. Rules let R365 attempt to assign a vendor, account, or location to imported bank activity based on set conditions.
**Create bank rules for deposits and bank fees only. Do not create rules for vendor payments** — all vendor payments must be recorded through an invoice or manual payment.
To create a rule, select the **Add Rule** checkbox on an activity row where the vendor, account, or location fields are populated, then select **Add** or **Bulk Add**. If a rule needs deleting, contact the accounting manager for the client.
### Exclude transactions
Transactions that aren't needed should be **excluded, not deleted** — excluding prevents them from reimporting later.
Select the transactions, choose **Exclude Selected** from the Select Command dropdown, and click **Save Changes**.
 If the transaction is needed but should not be subject to a bank rule, either delete the rule or update it so the transaction no longer fits the criteria.
### Auto-match logic
Bank activity matches transactions indefinitely backward, **not forward**. The matching sequence:
1. Accounts match, amounts match, within +2 days → **Match**
2. Same check number, within +2 days → **Match**
3. Dates match → **Match**
4. Amounts match and unique (only 1), within -4 days → **Match**
5. Amounts match and unique (only 1), within -7 days → **Match**
6. Locations match, within +2 days → **Match**
7. Amounts match, within +2 days → **Match**
8. Amounts match multiple records → **Potential match** (M on the Unmatched tab)
9. Steps 1–8 repeat for all undeposited funds account entries after the most recent closed date on the legal entity
Auto-matching only happens when there is exactly **one** possible match. If there is no matching transaction in R365, you can create deposits, withdrawals, or AP payments directly from bank activity.
### Handle multiple potential matches
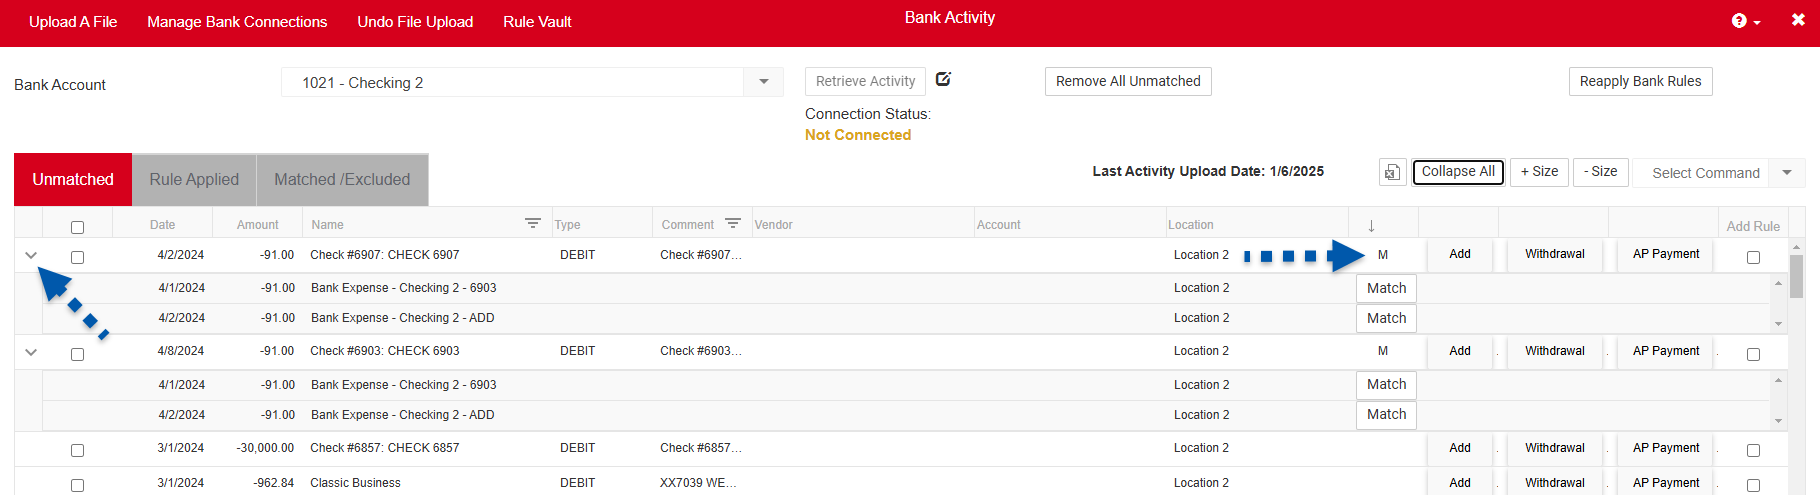
If more than one possible match exists — or the payment is a possible match within a payment batch — a potential match is flagged with an **M** at the end of the row.
Sort the column by clicking its header to bring all multiple-match transactions to the top. Use the expand option at the left of the row, or **expand all**, to view the matching options.
If the transaction is needed but should not be subject to a bank rule, either delete the rule or update it so the transaction no longer fits the criteria.
### Auto-match logic
Bank activity matches transactions indefinitely backward, **not forward**. The matching sequence:
1. Accounts match, amounts match, within +2 days → **Match**
2. Same check number, within +2 days → **Match**
3. Dates match → **Match**
4. Amounts match and unique (only 1), within -4 days → **Match**
5. Amounts match and unique (only 1), within -7 days → **Match**
6. Locations match, within +2 days → **Match**
7. Amounts match, within +2 days → **Match**
8. Amounts match multiple records → **Potential match** (M on the Unmatched tab)
9. Steps 1–8 repeat for all undeposited funds account entries after the most recent closed date on the legal entity
Auto-matching only happens when there is exactly **one** possible match. If there is no matching transaction in R365, you can create deposits, withdrawals, or AP payments directly from bank activity.
### Handle multiple potential matches
If more than one possible match exists — or the payment is a possible match within a payment batch — a potential match is flagged with an **M** at the end of the row.
Sort the column by clicking its header to bring all multiple-match transactions to the top. Use the expand option at the left of the row, or **expand all**, to view the matching options.
 ### Resolve duplicate bank rules
 Duplicate bank expenses on the bank activity screen can prevent the process from running successfully. Delete the duplicate entries using the trash can icon at the end of each duplicate row, then click **Save Changes** above the table. This enables rematching the unmatched bank transactions.
 ### Create transactions from bank activity
Deposits, bank fees, transfers, and payments applied to invoices can be created directly from the bank activity screen.
**Deposits** — enter a GL account number, choose the correct location, then click **Add** to post the transaction and clear it from bank activity. Deposits related to daily sales should automatically match the bank activity from the daily sales summary entries.
### Create transactions from bank activity
Deposits, bank fees, transfers, and payments applied to invoices can be created directly from the bank activity screen.
**Deposits** — enter a GL account number, choose the correct location, then click **Add** to post the transaction and clear it from bank activity. Deposits related to daily sales should automatically match the bank activity from the daily sales summary entries.
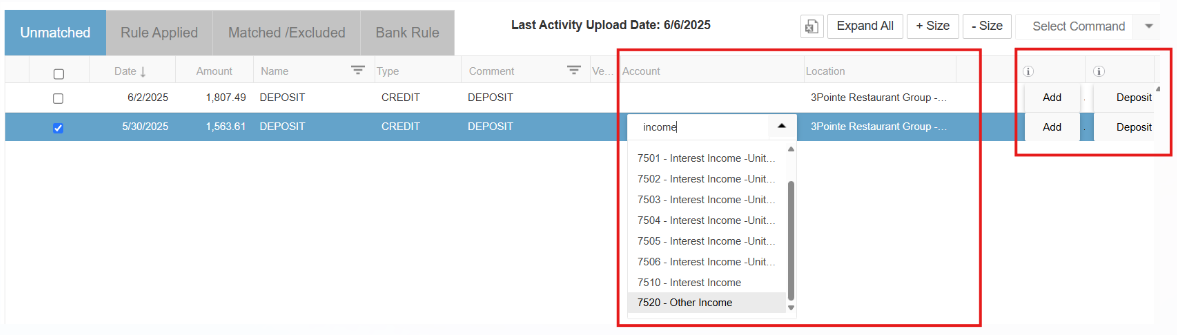 **Bank and credit card fees** — enter the account number and location, then click **Add** at the right.
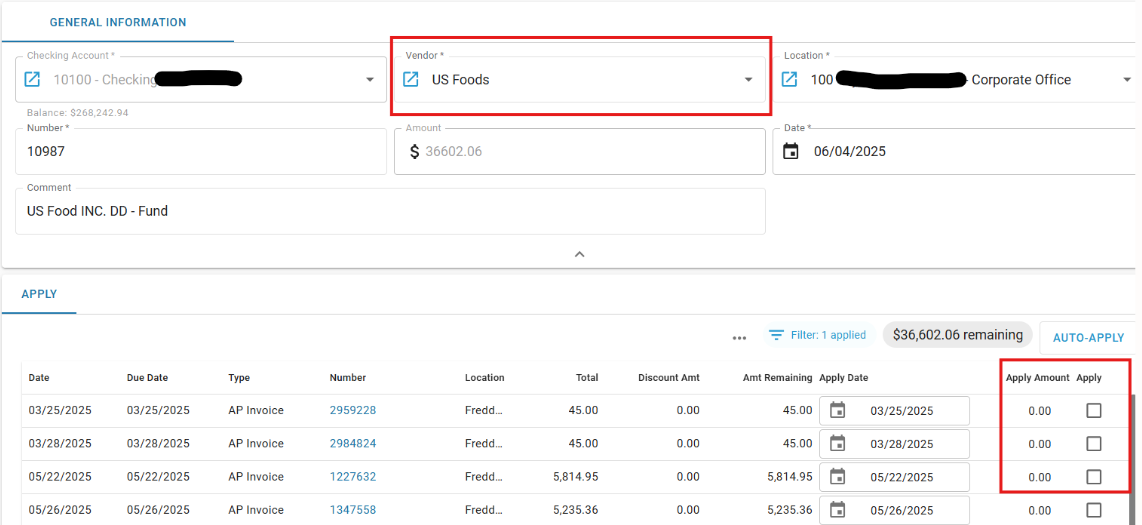
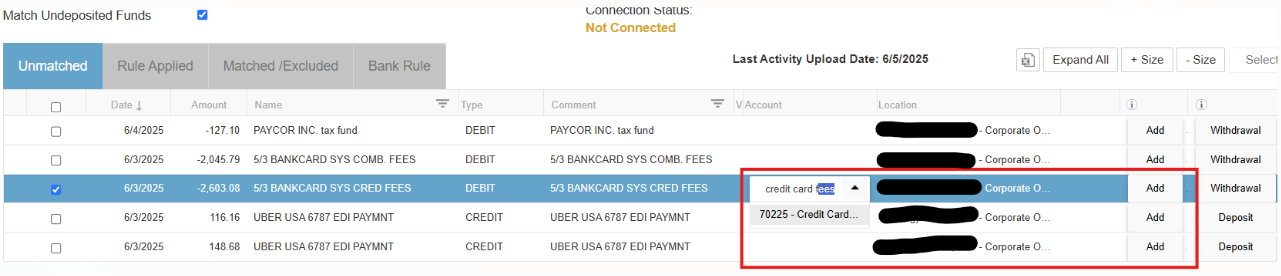 **Vendor payments applied to invoices** — click **AP Payment** at the right of the screen.
 The apply payment screen opens. Choose the vendor from the dropdown, verify the general information section, select the boxes in the **apply** column for each invoice paid, then click **create payment** in the top right.
 ### Mark as Paid for payments with no invoice
Payments with no invoice posted in R365 can use **Mark as Paid** to create a single payment for an individual invoice.
Go to the application bar → **Vendor → Invoice**. Create the invoice by completing the required fields and coding the expense, then toggle **Mark as Paid** to green.
### Mark as Paid for payments with no invoice
Payments with no invoice posted in R365 can use **Mark as Paid** to create a single payment for an individual invoice.
Go to the application bar → **Vendor → Invoice**. Create the invoice by completing the required fields and coding the expense, then toggle **Mark as Paid** to green.
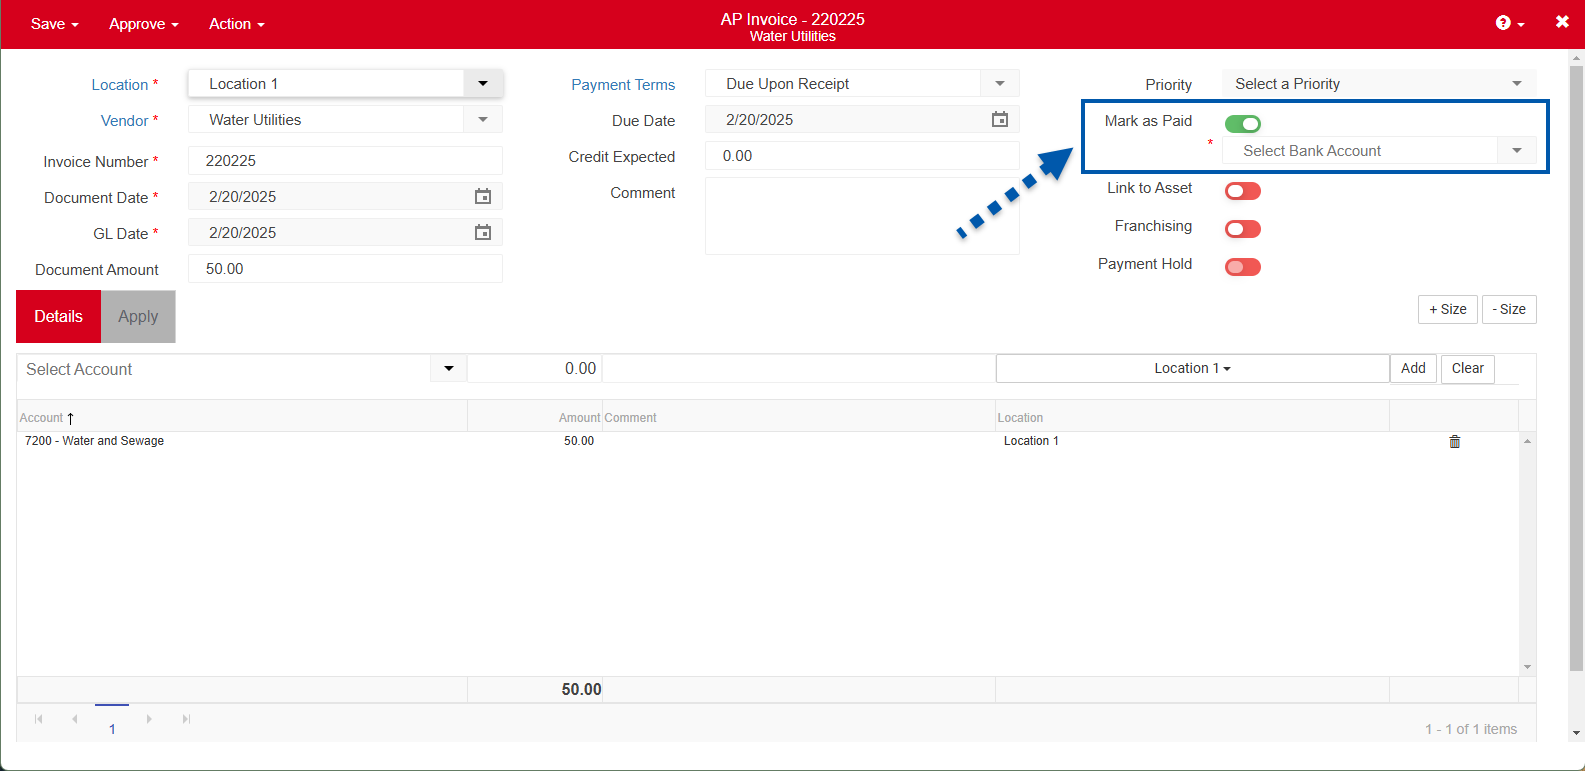 Before approving the invoice for AP payment creation, review these three fields — all three affect whether the payment will auto-match:
| Field | Requirement |
|---|---|
| **Due Date** | Used as the payment date on the generated AP payment. Ensure it is on or before the expected date of bank activity. |
| **Bank Account** | Must reflect the account funds will be withdrawn from. |
| **Amount Due** | Used as the payment amount, and must match the amount that will appear in bank activity. |
## Part 2 — Bank reconciliation
**Only one unapproved bank reconciliation can exist per bank account at a time.** If an unapproved rec represents a prior period, it must be approved before you can create a new one. To delete an unapproved reconciliation, open the record, hover over **Action**, and select **Delete**.
Before beginning, make sure you have a copy of the bank statement or online statement available.
Before approving the invoice for AP payment creation, review these three fields — all three affect whether the payment will auto-match:
| Field | Requirement |
|---|---|
| **Due Date** | Used as the payment date on the generated AP payment. Ensure it is on or before the expected date of bank activity. |
| **Bank Account** | Must reflect the account funds will be withdrawn from. |
| **Amount Due** | Used as the payment amount, and must match the amount that will appear in bank activity. |
## Part 2 — Bank reconciliation
**Only one unapproved bank reconciliation can exist per bank account at a time.** If an unapproved rec represents a prior period, it must be approved before you can create a new one. To delete an unapproved reconciliation, open the record, hover over **Action**, and select **Delete**.
Before beginning, make sure you have a copy of the bank statement or online statement available.
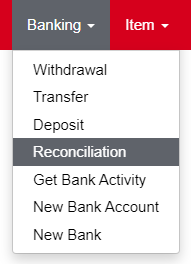 Hover over **Banking** in the top ribbon and click **Reconciliation**. Complete the following from your bank statement:
- **Checking Account**
- **Statement End Date**
- **Statement End Balance**
Then click **Retrieve Transactions** to retrieve all transactions for the account up to the statement date.
Hover over **Banking** in the top ribbon and click **Reconciliation**. Complete the following from your bank statement:
- **Checking Account**
- **Statement End Date**
- **Statement End Balance**
Then click **Retrieve Transactions** to retrieve all transactions for the account up to the statement date.
 The screen saves and refreshes the reconciliation name from 'New' to `(Checking Account Name) – (Date) – Reconciliation`, in unapproved status.
 | Field | Meaning |
|---|---|
| **Beginning Balance** | The last reconciled balance. For a first-time reconciliation, set it on the GL Account record for this checking account — the **Last Reconciled Balance** field in the Banking Info section. |
| **− Checks / Withdrawals** | Updates automatically as transactions are marked below. Non-editable. |
| **+ Deposits / Other Credits** | Updates automatically as transactions are marked below. Non-editable. |
| **= Cleared Balance** | Updates automatically. Non-editable. |
| **Statement End Date** | Entered in the previous step |
| **Statement End Balance** | Entered in the previous step. Editable, though you would not normally change it — doing so recalculates **Difference**. |
| **Difference** | Cleared Balance less Statement End Balance |
The **Checks / Withdrawals** tab appears first, with boxes already checked for transactions matched from the bank activity screen. Manually check any additional items that need clearing.
| Field | Meaning |
|---|---|
| **Beginning Balance** | The last reconciled balance. For a first-time reconciliation, set it on the GL Account record for this checking account — the **Last Reconciled Balance** field in the Banking Info section. |
| **− Checks / Withdrawals** | Updates automatically as transactions are marked below. Non-editable. |
| **+ Deposits / Other Credits** | Updates automatically as transactions are marked below. Non-editable. |
| **= Cleared Balance** | Updates automatically. Non-editable. |
| **Statement End Date** | Entered in the previous step |
| **Statement End Balance** | Entered in the previous step. Editable, though you would not normally change it — doing so recalculates **Difference**. |
| **Difference** | Cleared Balance less Statement End Balance |
The **Checks / Withdrawals** tab appears first, with boxes already checked for transactions matched from the bank activity screen. Manually check any additional items that need clearing.
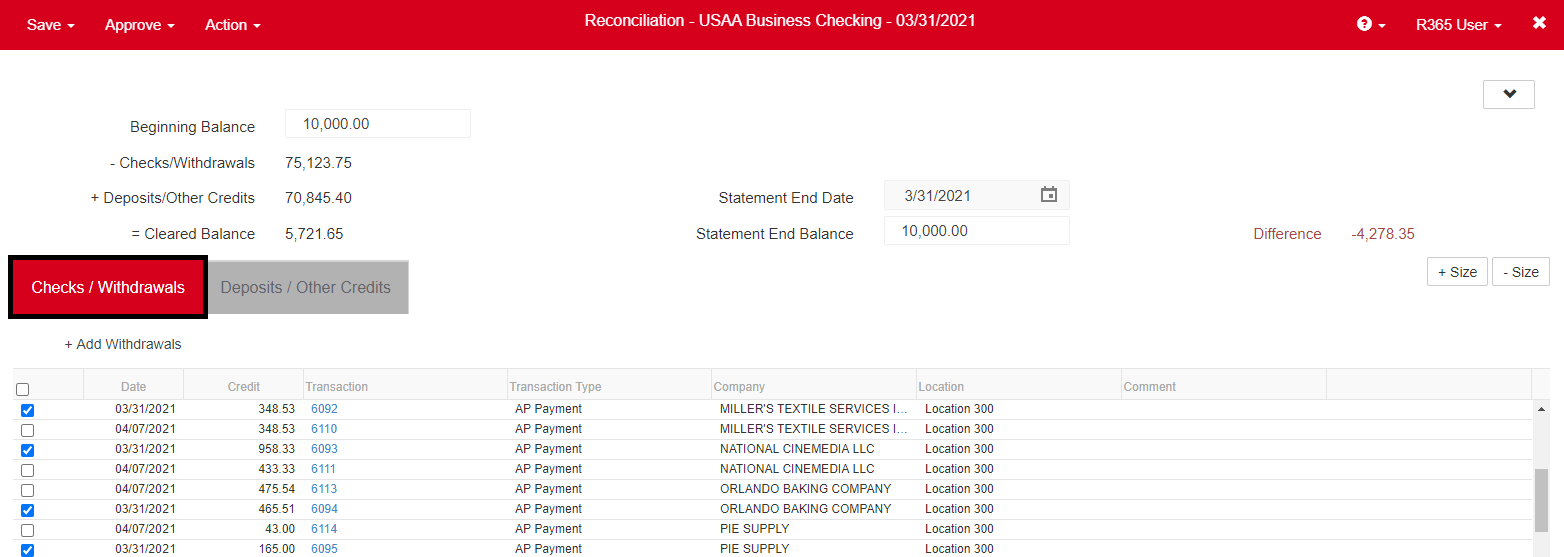 Sort by any column — or multiple columns. Clicking once sorts ascending, twice descending, and a third time turns off sorting for that column.
 If a transaction is matched to bank activity dated after the reconciliation date, it appears with a comment naming the bank activity it's matched to, plus an **Unmatch** button at the end of the row so it can be reconciled here instead. Drill into any transaction by clicking the blue **Number** field.
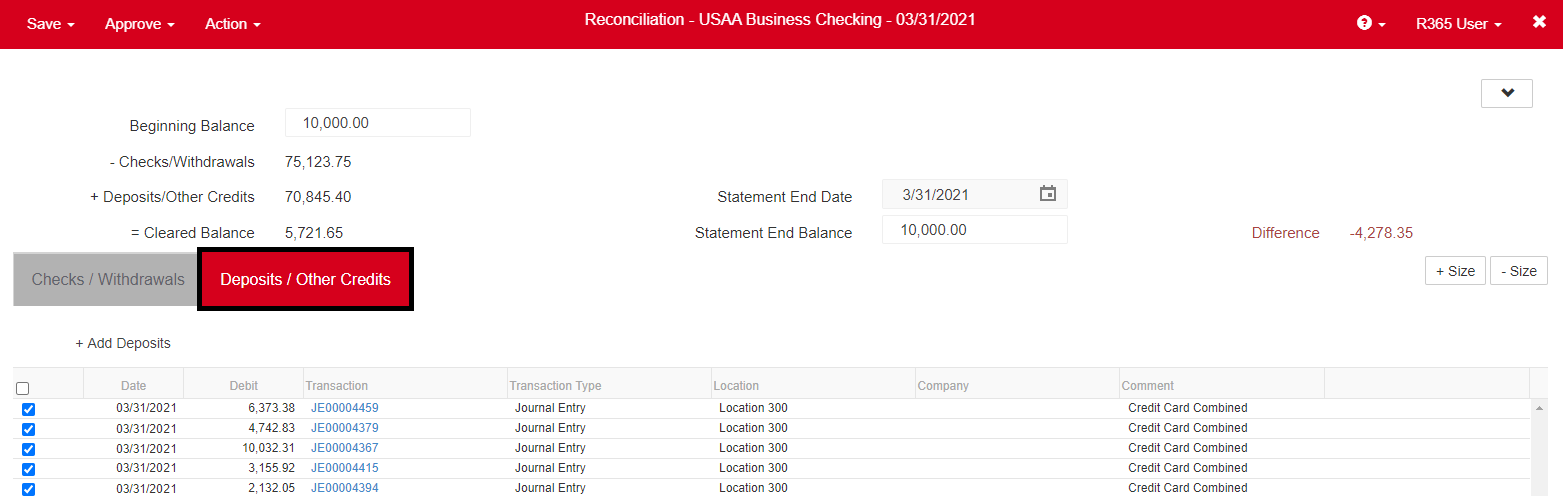 Then click the **Deposits / Other Credits** tab and repeat. To add a deposit not previously in R365, click **+ Add Deposit**, complete the required information, and click **Add** — you return to the Deposits view with the new deposit marked for reconciliation.
Enter **all** deposits exactly as the bank received them before completing the reconciliation. If you create a deposit while the reconciliation window is open (even with **Approve & New**), it will not appear until you click **Refresh** or close and reopen the reconciliation.
A voided transaction on the reconciliation — its number ends in `– V` — means someone voided a previously reconciled transaction. Clear it as follows:
1. Offset the void by creating a corresponding credit or withdrawal of the opposite type. A voided check on the **Checks / Withdrawals** tab needs an offsetting credit on the **Deposits / Other Credits** tab.
2. Mark **both** the void and the offsetting transaction.
To choose the account for the new transaction, look into the voided transaction for the original details.
The underlying situation: a transaction cleared the bank (or was mistakenly marked reconciled last month), was voided in a later month, and its debits and credits were reversed. The void must be offset for R365 to match the bank statement this month.
When all statement transactions are accounted for, the **Difference** in the header is $0.00. You can then **Approve** or **Save** the reconciliation.
Then click the **Deposits / Other Credits** tab and repeat. To add a deposit not previously in R365, click **+ Add Deposit**, complete the required information, and click **Add** — you return to the Deposits view with the new deposit marked for reconciliation.
Enter **all** deposits exactly as the bank received them before completing the reconciliation. If you create a deposit while the reconciliation window is open (even with **Approve & New**), it will not appear until you click **Refresh** or close and reopen the reconciliation.
A voided transaction on the reconciliation — its number ends in `– V` — means someone voided a previously reconciled transaction. Clear it as follows:
1. Offset the void by creating a corresponding credit or withdrawal of the opposite type. A voided check on the **Checks / Withdrawals** tab needs an offsetting credit on the **Deposits / Other Credits** tab.
2. Mark **both** the void and the offsetting transaction.
To choose the account for the new transaction, look into the voided transaction for the original details.
The underlying situation: a transaction cleared the bank (or was mistakenly marked reconciled last month), was voided in a later month, and its debits and credits were reversed. The void must be offset for R365 to match the bank statement this month.
When all statement transactions are accounted for, the **Difference** in the header is $0.00. You can then **Approve** or **Save** the reconciliation.
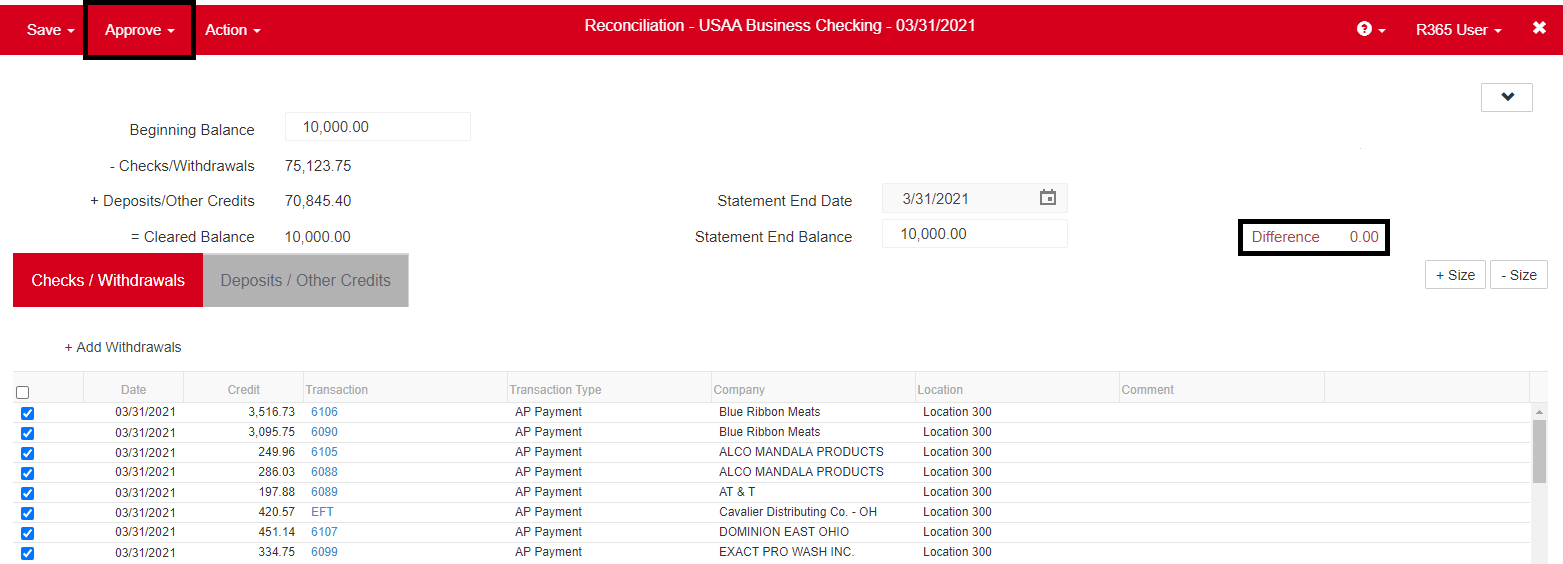 Three things to know:
- If you **Save** rather than approve, you cannot start a new reconciliation for that checking account until this one is approved or deleted.
- Approving a reconciliation is not approving a transaction — it indicates that a set of transactions within a period are in sync between R365 and the bank.
- **Once a transaction is included on a bank reconciliation it can no longer be unapproved.** Reconciling locks it down, which is a powerful control over cash.
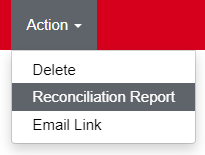
The **Reconciliation Report** is in the **Action** menu. It displays all cleared transactions along with beginning and ending account information, and can be run at any point during the process.
Three things to know:
- If you **Save** rather than approve, you cannot start a new reconciliation for that checking account until this one is approved or deleted.
- Approving a reconciliation is not approving a transaction — it indicates that a set of transactions within a period are in sync between R365 and the bank.
- **Once a transaction is included on a bank reconciliation it can no longer be unapproved.** Reconciling locks it down, which is a powerful control over cash.
The **Reconciliation Report** is in the **Action** menu. It displays all cleared transactions along with beginning and ending account information, and can be run at any point during the process.
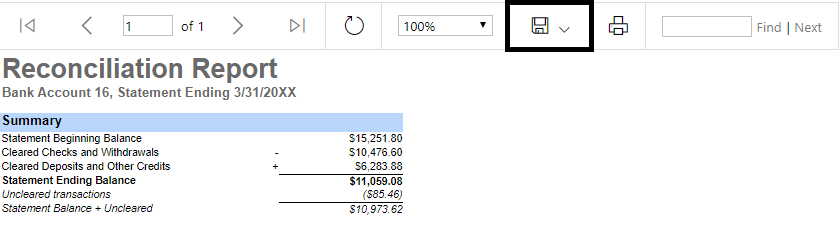 Export to Excel and copy/paste into the period close workbook.
**Expected outcome:** the reconciliation is approved with a $0.00 difference, and the report is filed in the period close workbook.
If a transaction included on the reconciliation is changed afterward, the report will not reflect that change. R365 places a visual cue on every cleared transaction — two fields at the bottom showing the reconciliation date and a link to the reconciliation itself — so you can tell whether a transaction has already been reconciled before modifying it.
## How voids interact with reconciliation
Nothing shows up on the bank rec, because the transaction is cancelled.
The reversing side of the entry shows up on the bank rec. Voiding something that already cleared requires communication with the bank to be credited for it — if they credit you, the reversing entry balances against that bank credit. **If the original cleared and the bank is not crediting you for it, you probably don't want to void it.**
This would keep the bank rec from balancing to $0, so an adjusting entry was likely made on that rec to balance it. If the original transaction is later voided, **the adjusting entry must be voided as well**.
## Related documents
- [Bank reconciliation concepts](/internal/sops/accounting/general/bank-reconciliation-concepts) — terminology and the standard steps
- [Intacct bank reconciliation](/internal/sops/accounting/general/intacct-bank-reconciliation) — the equivalent procedure in Sage Intacct
- [PBI vs. client responsibilities](/internal/sops/accounting/responsibilities)
- R365 product documentation: [Bank Activity page](https://docs.restaurant365.com/doc/docs/bank-activity-page), [Update and match transactions](https://docs.restaurant365.com/doc/docs/bank-activity-update-and-match-transactions), [Rule Vault](https://docs.restaurant365.com/doc/docs/rule-vault-overview-security), [Multiple potential matches](https://docs.restaurant365.com/doc/docs/multiple-potential-matches-in-bank-activity)
Export to Excel and copy/paste into the period close workbook.
**Expected outcome:** the reconciliation is approved with a $0.00 difference, and the report is filed in the period close workbook.
If a transaction included on the reconciliation is changed afterward, the report will not reflect that change. R365 places a visual cue on every cleared transaction — two fields at the bottom showing the reconciliation date and a link to the reconciliation itself — so you can tell whether a transaction has already been reconciled before modifying it.
## How voids interact with reconciliation
Nothing shows up on the bank rec, because the transaction is cancelled.
The reversing side of the entry shows up on the bank rec. Voiding something that already cleared requires communication with the bank to be credited for it — if they credit you, the reversing entry balances against that bank credit. **If the original cleared and the bank is not crediting you for it, you probably don't want to void it.**
This would keep the bank rec from balancing to $0, so an adjusting entry was likely made on that rec to balance it. If the original transaction is later voided, **the adjusting entry must be voided as well**.
## Related documents
- [Bank reconciliation concepts](/internal/sops/accounting/general/bank-reconciliation-concepts) — terminology and the standard steps
- [Intacct bank reconciliation](/internal/sops/accounting/general/intacct-bank-reconciliation) — the equivalent procedure in Sage Intacct
- [PBI vs. client responsibilities](/internal/sops/accounting/responsibilities)
- R365 product documentation: [Bank Activity page](https://docs.restaurant365.com/doc/docs/bank-activity-page), [Update and match transactions](https://docs.restaurant365.com/doc/docs/bank-activity-update-and-match-transactions), [Rule Vault](https://docs.restaurant365.com/doc/docs/rule-vault-overview-security), [Multiple potential matches](https://docs.restaurant365.com/doc/docs/multiple-potential-matches-in-bank-activity)