---
title: "Day-to-Day AP Transactions in Sage Intacct"
sidebarTitle: "Day-to-day AP in Intacct"
description: "Reference procedures for everyday Accounts Payable work in Sage Intacct — vendor terms, bills, recurring entries, check runs, voids, manual payments, and adjustments."
icon: "table-list"
---
> **For AI agents:** the complete documentation index is at [llms.txt](/llms.txt). Append `.md` to any page URL for its markdown version.
| Field | Value |
|---|---|
| **Owner** | Unassigned — needs an owner |
| **Department** | Accounts Payable |
| **Effective date** | Not set in source |
| **Scope** | The routine AP transactions an Intacct user performs day to day. Each section is an independent procedure. Does not cover invoices captured through Plate IQ or MarginEdge — those follow [the MarginEdge SOP](/internal/sops/accounting/ap/marginedge-invoice-processing) — and does not cover the NACHA bank file process. |
| **Source** | `Accounts Payable Department/Accounts Payable Processes.docx` |
This is a reference page rather than a single linear procedure. Each section below answers one question and can be followed on its own.
Intacct work happens at two levels, and the level matters. Vendors, terms, and bills are created at the **top level**. Payment selection, check printing, registers, and adjustments are performed at the **entity level**. Each procedure below states which level to start from.
## Create vendor terms
Terms drive due date calculation on every bill, so they are worth setting up carefully once.
1. From the **top level**, go to **Accounts Payable → Setup → Terms** and click **Add**.
2. Enter a unique name and description. Write these out clearly — do not use shortened abbreviations such as `N30` for Net 30 Days.
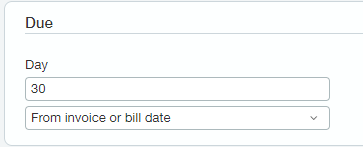
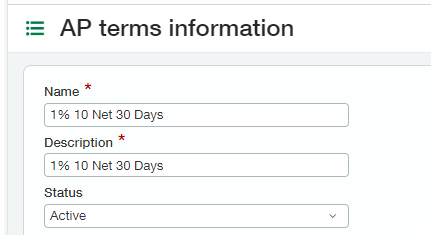 3. Enter the correct due date information.
 4. Enter discount information in the discount box if you want to apply vendor discounts to invoices. Discounts can be calculated on the bill total or line by line.
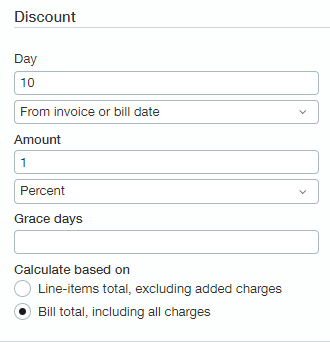 There is no field within invoice entry to add a discount manually. If discount information is not configured on the term, vendor discounts cannot be applied to that vendor's invoices at all.
5. Click **Save**.
## Add a vendor
A fuller version of this procedure, including the 1099 and W-9 requirements, is documented separately in [Add a new vendor in Sage Intacct](/internal/sops/accounting/ap/adding-a-vendor). Follow that page for new vendor setup; the summary below covers the tab-by-tab layout.
1. From the **top level**, go to **Accounts Payable → Vendors** and click the plus sign.
There is no field within invoice entry to add a discount manually. If discount information is not configured on the term, vendor discounts cannot be applied to that vendor's invoices at all.
5. Click **Save**.
## Add a vendor
A fuller version of this procedure, including the 1099 and W-9 requirements, is documented separately in [Add a new vendor in Sage Intacct](/internal/sops/accounting/ap/adding-a-vendor). Follow that page for new vendor setup; the summary below covers the tab-by-tab layout.
1. From the **top level**, go to **Accounts Payable → Vendors** and click the plus sign.
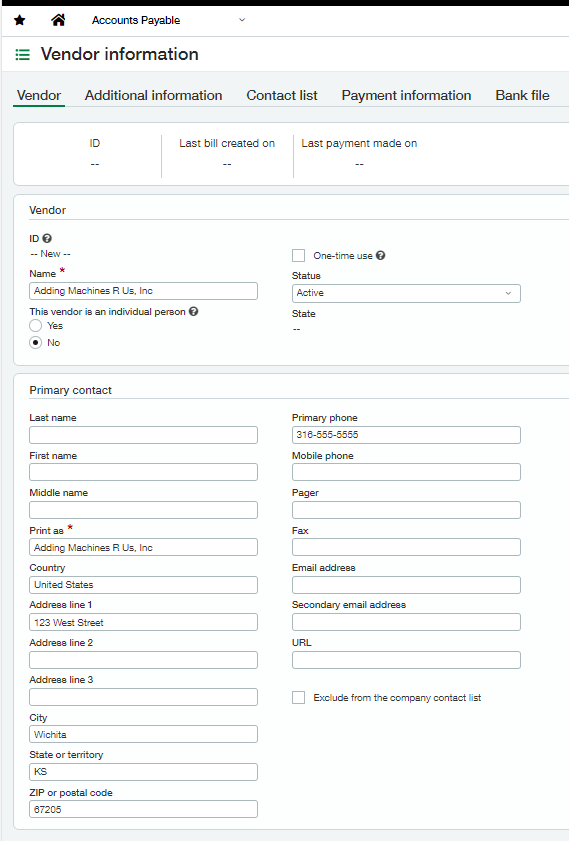
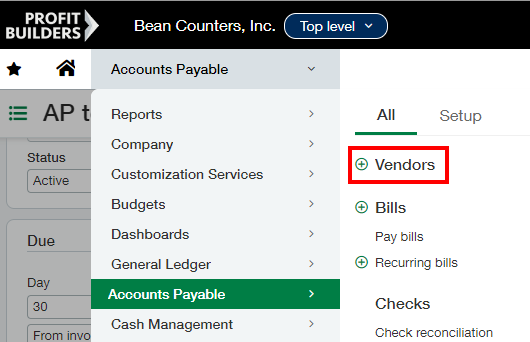 2. On the **Vendor** tab, complete the name and **Print As** field (both required) along with any other contact information. The ID generates automatically.
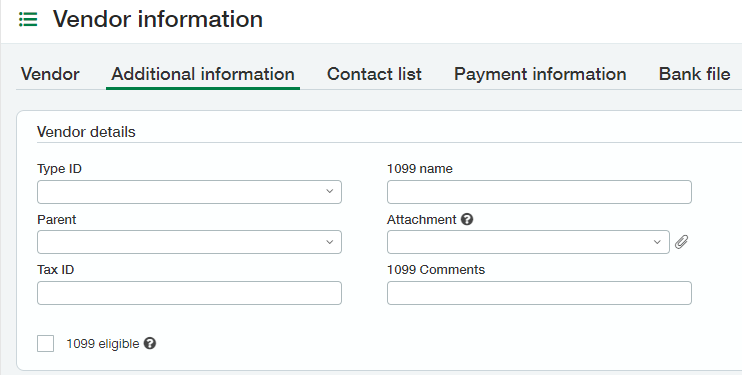
 3. On the **Additional Information** tab, select the **Type ID** (check, ACH, credit card) and complete the 1099 information if applicable — Tax ID, 1099 eligible box, 1099 name, and W-9 attachment. If no W-9 was provided, request one and add a comment with the date and the method of request. Hard-code the vendor to a specific GL account if possible.
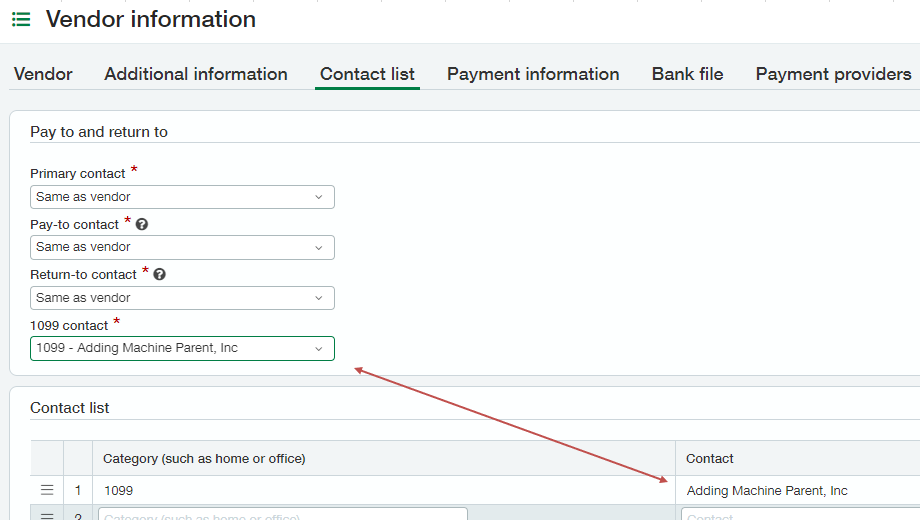
 4. On the **Contact List** tab, save any additional contacts — for example a different 1099 address. Saved contacts become available in the **Pay to** and **Return to** dropdowns.
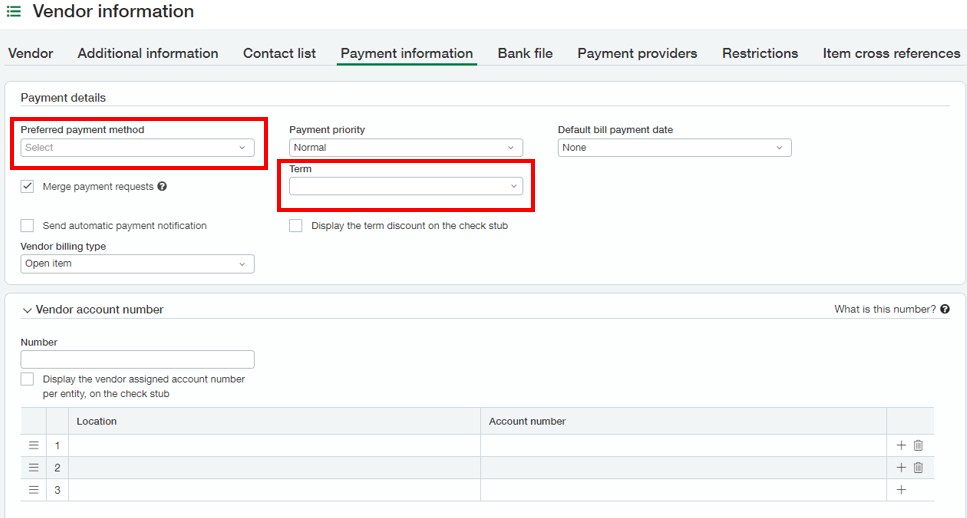
 5. On the **Payment Information** tab, set the **Preferred payment method** and **Terms** (both required). The preferred payment method is what lets you filter vendors for payment selection. If a vendor requires separate checks for each invoice, clear the **Merge payment requests** box. Enter account or client numbers in the **Vendor account number** field wherever possible.
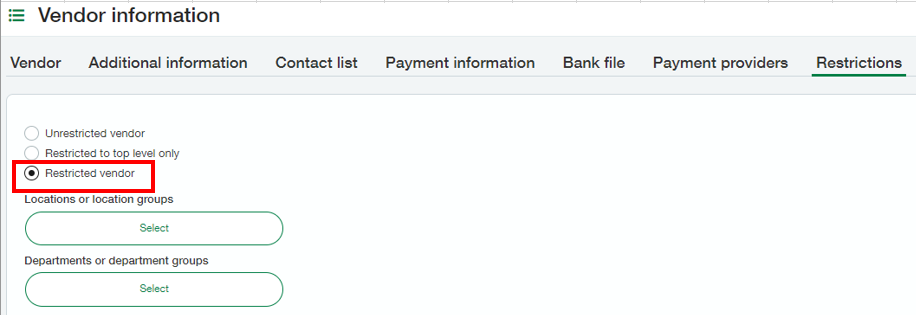
 6. On the **Restrictions** tab, restrict the vendor to specific entities, locations, or departments if it should not be available globally.
 7. Click **Save**.
## Create a bill
Any bill that has an invoice image should be created through the Plate IQ or BILL process instead. Use these steps for bills that wouldn't typically have an invoice, such as rent or a guaranteed payment.
1. From the **top level**, go to **Accounts Payable → Bills** and click **Add**.
2. Complete the first section, noting the following:
- The **GL posting date** auto-fills from the invoice date. Change it manually if the invoice falls in a different period than the invoice date.
- The **reference number** field prints on the check.
- The **terms** field should not be blank — it pre-fills from vendor setup. If it's blank, fix the vendor setup.
- The **due date** should calculate correctly. If it doesn't, fix the terms in the vendor setup.
- Attach any backup and also save it in the client SharePoint site.
7. Click **Save**.
## Create a bill
Any bill that has an invoice image should be created through the Plate IQ or BILL process instead. Use these steps for bills that wouldn't typically have an invoice, such as rent or a guaranteed payment.
1. From the **top level**, go to **Accounts Payable → Bills** and click **Add**.
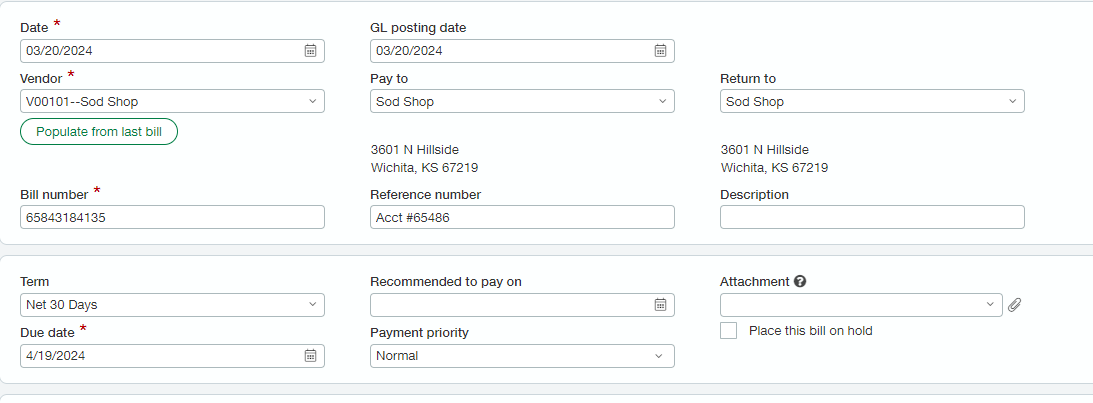
2. Complete the first section, noting the following:
- The **GL posting date** auto-fills from the invoice date. Change it manually if the invoice falls in a different period than the invoice date.
- The **reference number** field prints on the check.
- The **terms** field should not be blank — it pre-fills from vendor setup. If it's blank, fix the vendor setup.
- The **due date** should calculate correctly. If it doesn't, fix the terms in the vendor setup.
- Attach any backup and also save it in the client SharePoint site.
 3. In the entries section, enter the account number, amount, location, and any other applicable dimension information. Additional fields are available under **Show Details**. Anything entered in the memo field shows in the GL detail.
 4. Choose how to finish:
- Click **Post & New** if you are ready to post.
- Click **Draft & New** to save the bill for later review.
## Create a recurring entry
1. From the **top level**, go to **Accounts Payable → Recurring bills → Add**.
2. On the **Bills** tab, select the vendor from the dropdown or add one.
3. Create a bill sequence number. Click the dropdown, then click **Add**.
4. Choose how to finish:
- Click **Post & New** if you are ready to post.
- Click **Draft & New** to save the bill for later review.
## Create a recurring entry
1. From the **top level**, go to **Accounts Payable → Recurring bills → Add**.
2. On the **Bills** tab, select the vendor from the dropdown or add one.
3. Create a bill sequence number. Click the dropdown, then click **Add**.
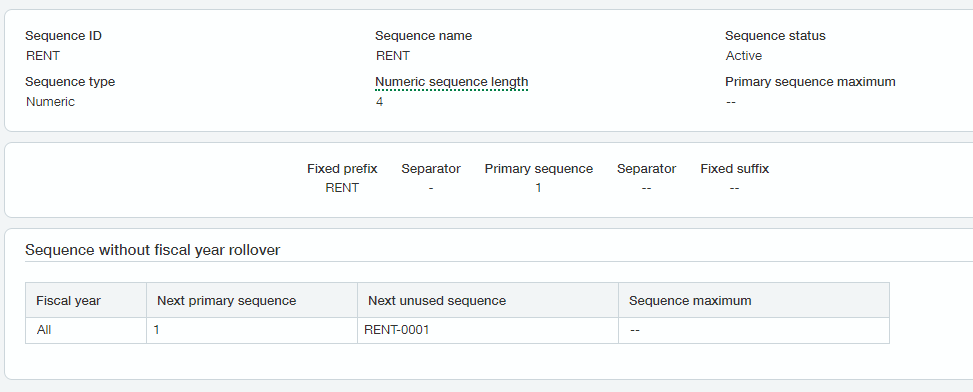
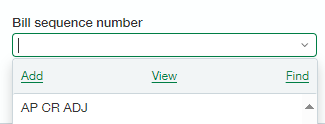 4. In the document sequence information box, enter a sequence ID (this cannot be changed later), the sequence name, a sequence length, fixed prefix, primary sequence, and the next primary sequence. The next unused sequence is shown as a preview for verification.
 5. Fill in anything you want recorded with the bill — reference number (prints on the check), description, dimensions. You can also attach a document such as a payment schedule or lease.
6. Complete the **terms** field. It is required.
7. In the items section, enter the GL account, amount, and any required dimensions.
8. On the **Schedule** tab, set:
- **Start Date** — the first day the bill will be created. It must be a future date.
- **Ending on** — end after a number of occurrences, on a specific date, or never.
- **Repeat** — days, weeks, months (or end of month), or years.
5. Fill in anything you want recorded with the bill — reference number (prints on the check), description, dimensions. You can also attach a document such as a payment schedule or lease.
6. Complete the **terms** field. It is required.
7. In the items section, enter the GL account, amount, and any required dimensions.
8. On the **Schedule** tab, set:
- **Start Date** — the first day the bill will be created. It must be a future date.
- **Ending on** — end after a number of occurrences, on a specific date, or never.
- **Repeat** — days, weeks, months (or end of month), or years.
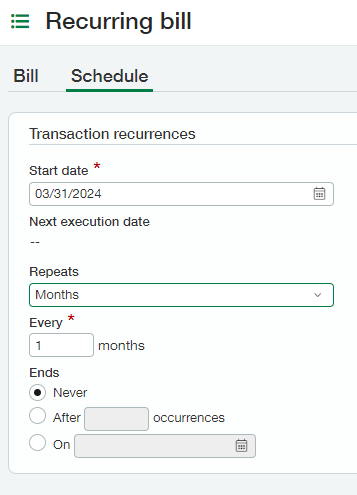 9. Click **Save**, or **Save & New** to continue entering recurring bills.
## Select an invoice for payment by check
1. From the **entity level**, go to **Accounts Payable → Select Pay Bills**.
2. Create a filter at the entity level so unpaid invoices created at the top level are visible.
9. Click **Save**, or **Save & New** to continue entering recurring bills.
## Select an invoice for payment by check
1. From the **entity level**, go to **Accounts Payable → Select Pay Bills**.
2. Create a filter at the entity level so unpaid invoices created at the top level are visible.
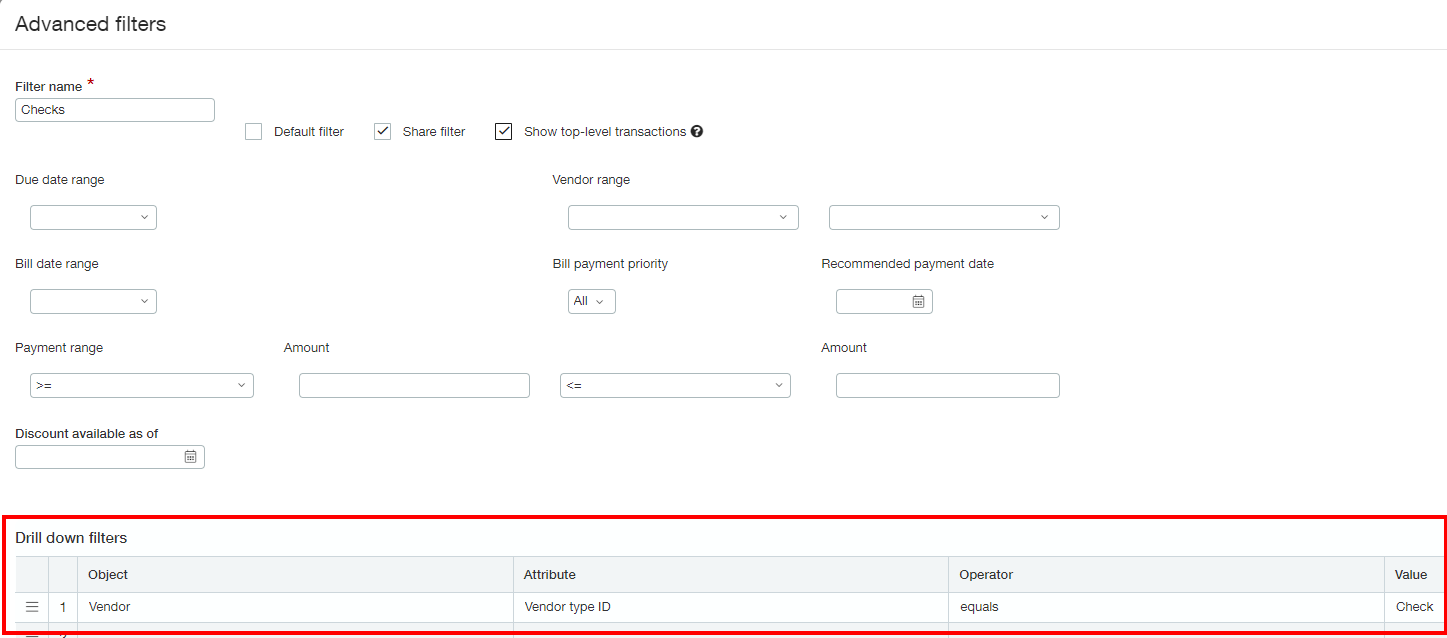
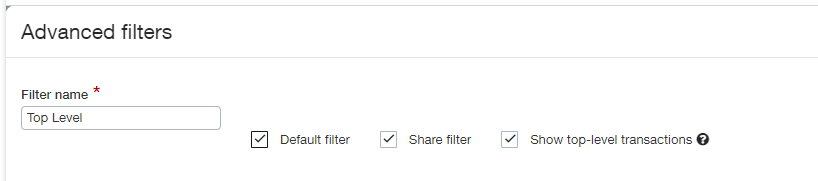 3. Narrow the list using filters. Two are commonly used together:
- Filter on **vendor type ID** to show vendors paid by check, ACH, and so on.
3. Narrow the list using filters. Two are commonly used together:
- Filter on **vendor type ID** to show vendors paid by check, ACH, and so on.
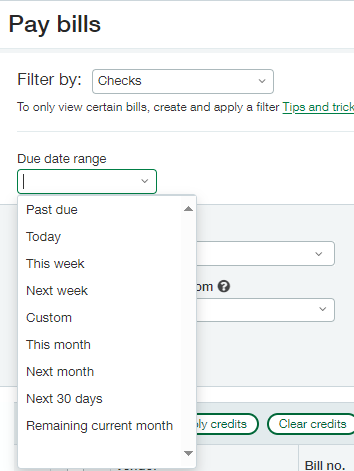
 - Filter by **due date** to select all outstanding payments due before a specific date, such as before the next payment run.
 4. On the Pay Bills screen, verify the **Pay Method** is Check and that the **Bank** and **Payment Date** fields are correct. Use the Select boxes on the left to select all or specific bills. The amount to pay appears on the right.
 5. Adjust the **amount to pay** fields individually if a partial payment is needed.
6. Apply credits with the **Apply credits** button, or enter them manually in the **Credit to Apply** field. To select specific individual credits, click **Line details**, then **Credit details**.
You cannot apply a credit that is not available. If the credit doesn't appear, confirm it has been posted.
7. Review the total amount to pay for accuracy and click **Pay now**.
8. Repeat these steps to select additional bills, then perform a single check run.
## Cancel an approved payment
1. From the **entity level**, go to **Accounts Payable → View Payment Requests**.
2. Select the checkbox for the payment and click the **Cancel Request** link to the right of the invoice.
3. Click **Ok** on the confirmation prompt.
5. Adjust the **amount to pay** fields individually if a partial payment is needed.
6. Apply credits with the **Apply credits** button, or enter them manually in the **Credit to Apply** field. To select specific individual credits, click **Line details**, then **Credit details**.
You cannot apply a credit that is not available. If the credit doesn't appear, confirm it has been posted.
7. Review the total amount to pay for accuracy and click **Pay now**.
8. Repeat these steps to select additional bills, then perform a single check run.
## Cancel an approved payment
1. From the **entity level**, go to **Accounts Payable → View Payment Requests**.
2. Select the checkbox for the payment and click the **Cancel Request** link to the right of the invoice.
3. Click **Ok** on the confirmation prompt.
 ## Print a check after selection
1. From the **entity level**, go to **Accounts Payable → Print → Checks**.
2. In the Print Options box, verify the check style is **Blank MICR checks** and **Checks per page** is set to **One**.
3. In the Checks to be printed box, click the **Print** checkbox to select all checks. Review the check memo box to confirm vendor account numbers are entered as needed — the check memo prints above the amount field.
## Print a check after selection
1. From the **entity level**, go to **Accounts Payable → Print → Checks**.
2. In the Print Options box, verify the check style is **Blank MICR checks** and **Checks per page** is set to **One**.
3. In the Checks to be printed box, click the **Print** checkbox to select all checks. Review the check memo box to confirm vendor account numbers are entered as needed — the check memo prints above the amount field.
 4. Click **Print** at the top right. A PDF of the checks opens. Review it for correct information — address, signature — before printing to a MICR printer.
5. Confirm the checks printed correctly before closing the PDF.
If the check setup is wrong or the checks printed incorrectly (for example paper loaded the wrong way), you can close the PDF and print again — but **only if you have not yet confirmed the checks**.
6. Once the PDF is created, a check number is assigned to the payments. Then either:
- **Confirm** — select the boxes in the Confirm/Void column and click **Confirm**.
- **Void** — select the box in the Confirm/Void column and click **Void**. Voiding returns the invoice to a selected-for-payment status; you must then either pay it or cancel it from the approved payments screen.
## Void a check that has been confirmed
Verify the check has not cleared the bank before voiding it.
1. From the **entity level**, go to **Accounts Payable → Registers → Check Register**.
2. Search for the check by date, vendor, or check number. If you search by check number and nothing appears, widen the date range.
3. Locate the check and click the blue **void** link at the far right.
4. Click **Print** at the top right. A PDF of the checks opens. Review it for correct information — address, signature — before printing to a MICR printer.
5. Confirm the checks printed correctly before closing the PDF.
If the check setup is wrong or the checks printed incorrectly (for example paper loaded the wrong way), you can close the PDF and print again — but **only if you have not yet confirmed the checks**.
6. Once the PDF is created, a check number is assigned to the payments. Then either:
- **Confirm** — select the boxes in the Confirm/Void column and click **Confirm**.
- **Void** — select the box in the Confirm/Void column and click **Void**. Voiding returns the invoice to a selected-for-payment status; you must then either pay it or cancel it from the approved payments screen.
## Void a check that has been confirmed
Verify the check has not cleared the bank before voiding it.
1. From the **entity level**, go to **Accounts Payable → Registers → Check Register**.
2. Search for the check by date, vendor, or check number. If you search by check number and nothing appears, widen the date range.
3. Locate the check and click the blue **void** link at the far right.
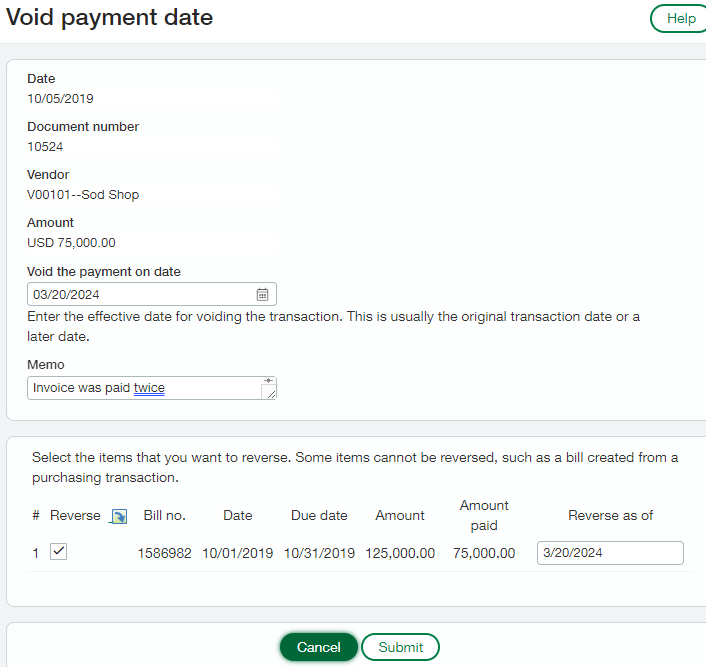
 4. In the void screen, enter a **void date** and a **reason for the void** in the memo section. Do not leave the memo blank.
5. If the invoice also needs reversing, select the **reverse** box and enter a reversal date. Ask the accounting manager if you are unsure of the correct dates.
6. Click **Submit**.
4. In the void screen, enter a **void date** and a **reason for the void** in the memo section. Do not leave the memo blank.
5. If the invoice also needs reversing, select the **reverse** box and enter a reversal date. Ask the accounting manager if you are unsure of the correct dates.
6. Click **Submit**.
 ## Apply an outstanding invoice to a payment (ACH or manual check)
This is similar to selecting invoices for payment by check.
1. From the **entity level**, go to **Accounts Payable → Pay bills**.
2. Filter the list of bills to pay — by **vendor type ID**, then by **due date**.
3. Verify the **pay method** is set to **EFT**, the correct bank account is selected, and the payment date matches the bank transaction (for ACH) or the check date.
## Apply an outstanding invoice to a payment (ACH or manual check)
This is similar to selecting invoices for payment by check.
1. From the **entity level**, go to **Accounts Payable → Pay bills**.
2. Filter the list of bills to pay — by **vendor type ID**, then by **due date**.
3. Verify the **pay method** is set to **EFT**, the correct bank account is selected, and the payment date matches the bank transaction (for ACH) or the check date.
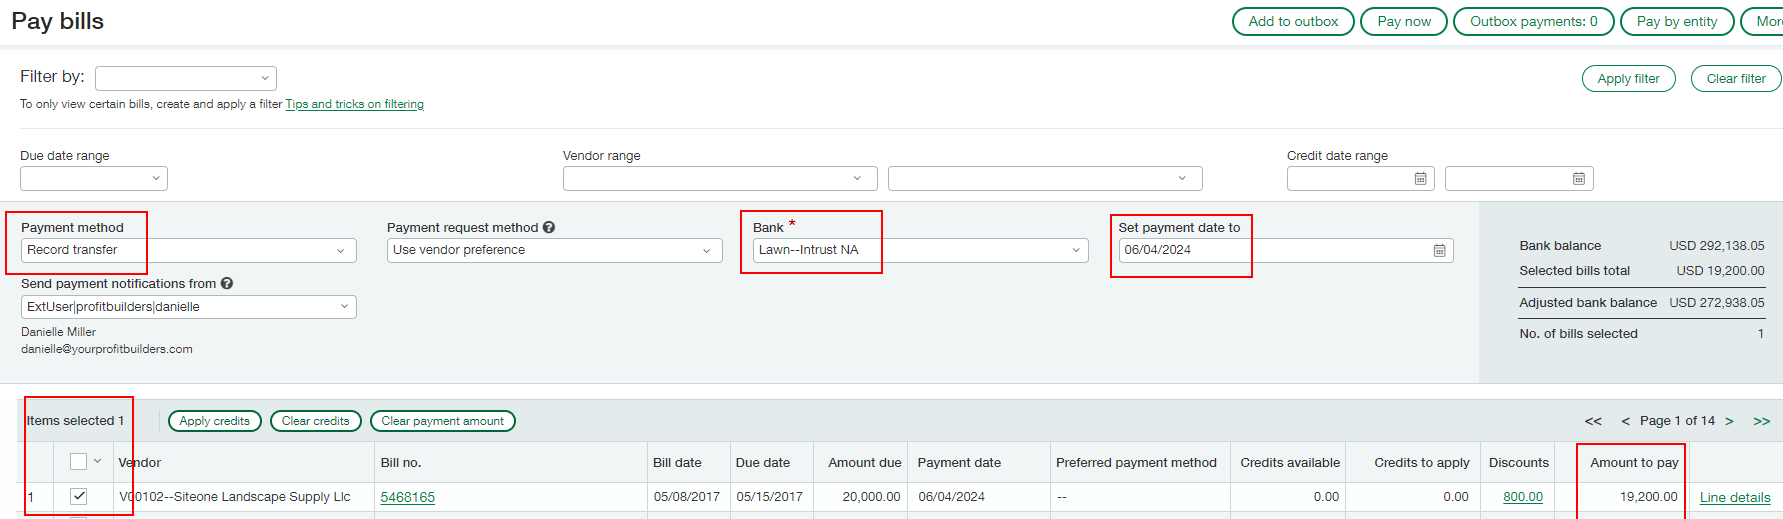 4. Select the appropriate bills and apply any necessary credits. Verify the total amount due, then click **Pay Now**.
5. On the **Add more details** page, complete the **Document Number** field:
- For ACH payments, create an alphanumeric ID.
- For a manual check, record the manual check number.
4. Select the appropriate bills and apply any necessary credits. Verify the total amount due, then click **Pay Now**.
5. On the **Add more details** page, complete the **Document Number** field:
- For ACH payments, create an alphanumeric ID.
- For a manual check, record the manual check number.
 Never leave the Document Number blank. Intacct does not require it for EFT payments, but PBI process does — it is what makes the payment identifiable on the bank reconciliation.
6. Click **Save**.
**Expected outcome:** the payment is recorded and the invoice is removed from AP.
## Record a payment that does not have an open invoice
This is similar to creating a manual check in Sage and auto-generating an invoice number.
1. From the **entity level**, go to **Accounts Payable → Manual Payment** and click the plus sign.
2. Choose the payment method — **Check** for a customer-written manual check, or **Record Transfer** for an ACH payment.
3. Verify the correct bank account is being used.
4. Complete all required fields, including a bill number. Drag and drop an attachment if one is available.
5. Enter the document number:
- **Check** — Intacct requires a numeric check number.
- **Record Transfer** — Intacct does not require the document number, but you must enter an alphanumeric ID. Do not leave this blank.
Never leave the Document Number blank. Intacct does not require it for EFT payments, but PBI process does — it is what makes the payment identifiable on the bank reconciliation.
6. Click **Save**.
**Expected outcome:** the payment is recorded and the invoice is removed from AP.
## Record a payment that does not have an open invoice
This is similar to creating a manual check in Sage and auto-generating an invoice number.
1. From the **entity level**, go to **Accounts Payable → Manual Payment** and click the plus sign.
2. Choose the payment method — **Check** for a customer-written manual check, or **Record Transfer** for an ACH payment.
3. Verify the correct bank account is being used.
4. Complete all required fields, including a bill number. Drag and drop an attachment if one is available.
5. Enter the document number:
- **Check** — Intacct requires a numeric check number.
- **Record Transfer** — Intacct does not require the document number, but you must enter an alphanumeric ID. Do not leave this blank.
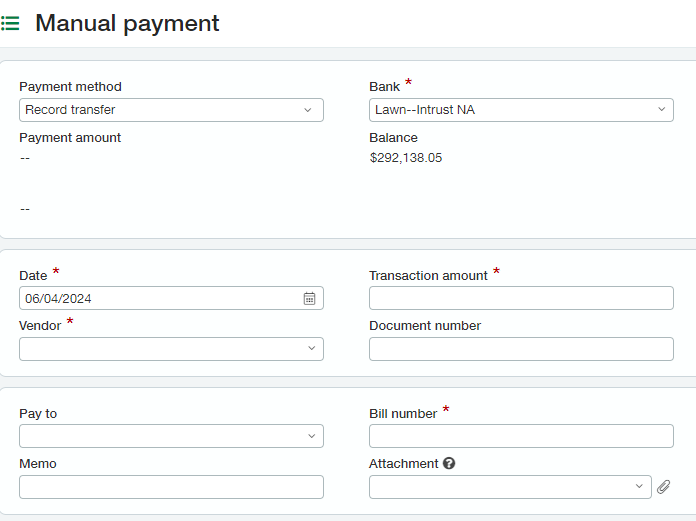 6. Enter the appropriate GL information in the Entries section.
7. Click **Save & Confirm**.
## Print a check register for a client
1. From the **entity level**, go to **Accounts Payable → Registers → Checks**.
2. Enter the start and end dates for the register.
3. Clear the **Show reconciliation status** and **Show details** checkboxes in the filters section, then click **View**.
4. Confirm the information is correct, export the report to Word, delete the account numbers, and save.
Deleting the bank account numbers before sending the register to a client is a required step, not a formatting preference.
## Enter an adjustment to an invoice
1. From the **entity level**, go to **Accounts Payable → Adjustments** (middle column) and click the plus sign.
2. Enter the date, the GL date, and the vendor.
3. Select **Debit Memo** or **Credit Memo** in the **Type** field:
- A **credit memo** increases the amount owed to a vendor.
- A **debit memo** decreases the amount owed to a vendor.
4. Select an invoice from the **reference bill number** dropdown if applicable.
5. Enter a reason for the adjustment in the description field. This is required.
6. Enter the GL, amount, and other dimension information in the Entries section.
7. Click **Post**.
## Related documents
- [Add a new vendor in Sage Intacct](/internal/sops/accounting/ap/adding-a-vendor)
- [Enable ACH payments for a vendor](/internal/sops/accounting/ap/ach-vendor-setup)
- [Positive pay file policy](/internal/sops/accounting/ap/positive-pay-file-policy) — required after any check run
- [Stuffing and mailing checks](/internal/sops/accounting/ap/stuffing-checks) — the physical handling of printed checks
- [Intacct bank reconciliation](/internal/sops/accounting/general/intacct-bank-reconciliation)
6. Enter the appropriate GL information in the Entries section.
7. Click **Save & Confirm**.
## Print a check register for a client
1. From the **entity level**, go to **Accounts Payable → Registers → Checks**.
2. Enter the start and end dates for the register.
3. Clear the **Show reconciliation status** and **Show details** checkboxes in the filters section, then click **View**.
4. Confirm the information is correct, export the report to Word, delete the account numbers, and save.
Deleting the bank account numbers before sending the register to a client is a required step, not a formatting preference.
## Enter an adjustment to an invoice
1. From the **entity level**, go to **Accounts Payable → Adjustments** (middle column) and click the plus sign.
2. Enter the date, the GL date, and the vendor.
3. Select **Debit Memo** or **Credit Memo** in the **Type** field:
- A **credit memo** increases the amount owed to a vendor.
- A **debit memo** decreases the amount owed to a vendor.
4. Select an invoice from the **reference bill number** dropdown if applicable.
5. Enter a reason for the adjustment in the description field. This is required.
6. Enter the GL, amount, and other dimension information in the Entries section.
7. Click **Post**.
## Related documents
- [Add a new vendor in Sage Intacct](/internal/sops/accounting/ap/adding-a-vendor)
- [Enable ACH payments for a vendor](/internal/sops/accounting/ap/ach-vendor-setup)
- [Positive pay file policy](/internal/sops/accounting/ap/positive-pay-file-policy) — required after any check run
- [Stuffing and mailing checks](/internal/sops/accounting/ap/stuffing-checks) — the physical handling of printed checks
- [Intacct bank reconciliation](/internal/sops/accounting/general/intacct-bank-reconciliation)