---
title: "Export Payroll from Aloha Enterprise"
sidebarTitle: "Aloha payroll export"
description: "Run the Profit Builders Payroll Export from Aloha Enterprise and forward it to your Customer Success Manager as approval to process payroll."
icon: "clock"
---
> **For AI agents:** the complete documentation index is at [llms.txt](/llms.txt). Append `.md` to any page URL for its markdown version.
This guide is written for **client store operators**, not PBI staff. It shows how to run the Profit Builders Payroll Export from Aloha Enterprise and deliver it to your Customer Success Manager (CSM).
**Source:** `Technical/Profit Builders Payroll Export Instructions_Aloha Enterprise.docx`
Aloha Enterprise credentials come **from corporate, not from PBI**. If you don't have login credentials, request them through your corporate contact.
## Procedure
Log in using the credentials provided by corporate.
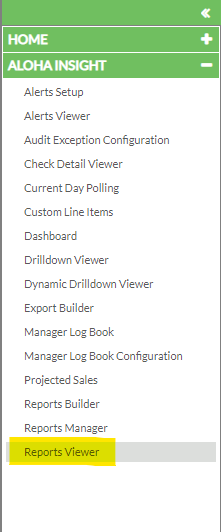 Navigate to **Aloha Insight → Reports Viewer** on the left navigation pane.
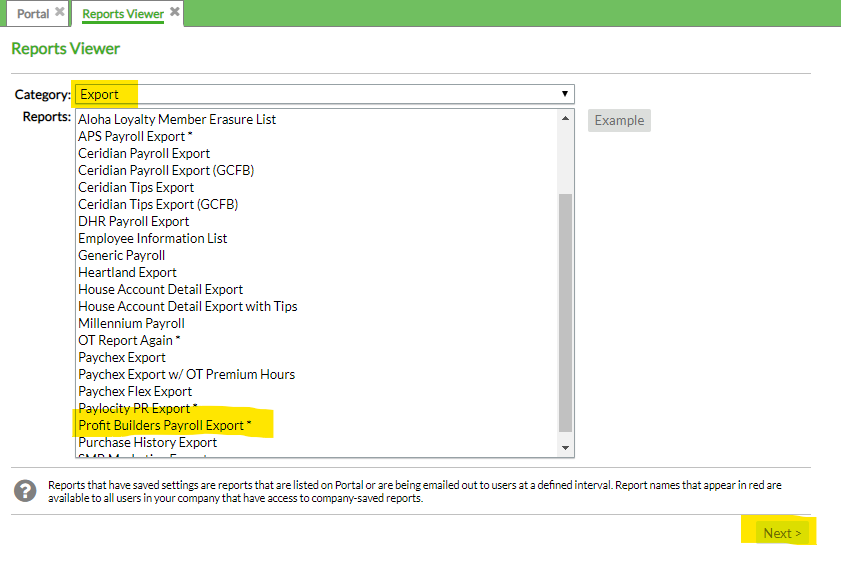 On the Reports Viewer page, change the **Category** dropdown to **Export**, then find and click the report titled **Profit Builders Payroll Export**. Click **Next**.
Work through each tab:
**Store Selection tab** — select **All Stores**.
**Report Settings tab:**
| Section | Setting |
|---|---|
| **Report Date Range Options** | Select **Use Custom Date Range** and enter the start and end date of the current payroll pay period you are approving |
| **Report Send Options** | Check **Email Me the Report Now** |
| **Other Report options** | Confirm it shows **Comma-separated values** |
| **Report name** | Include the **pay period end date** of the payroll you're working on |
On the Reports Viewer page, change the **Category** dropdown to **Export**, then find and click the report titled **Profit Builders Payroll Export**. Click **Next**.
Work through each tab:
**Store Selection tab** — select **All Stores**.
**Report Settings tab:**
| Section | Setting |
|---|---|
| **Report Date Range Options** | Select **Use Custom Date Range** and enter the start and end date of the current payroll pay period you are approving |
| **Report Send Options** | Check **Email Me the Report Now** |
| **Other Report options** | Confirm it shows **Comma-separated values** |
| **Report name** | Include the **pay period end date** of the payroll you're working on |
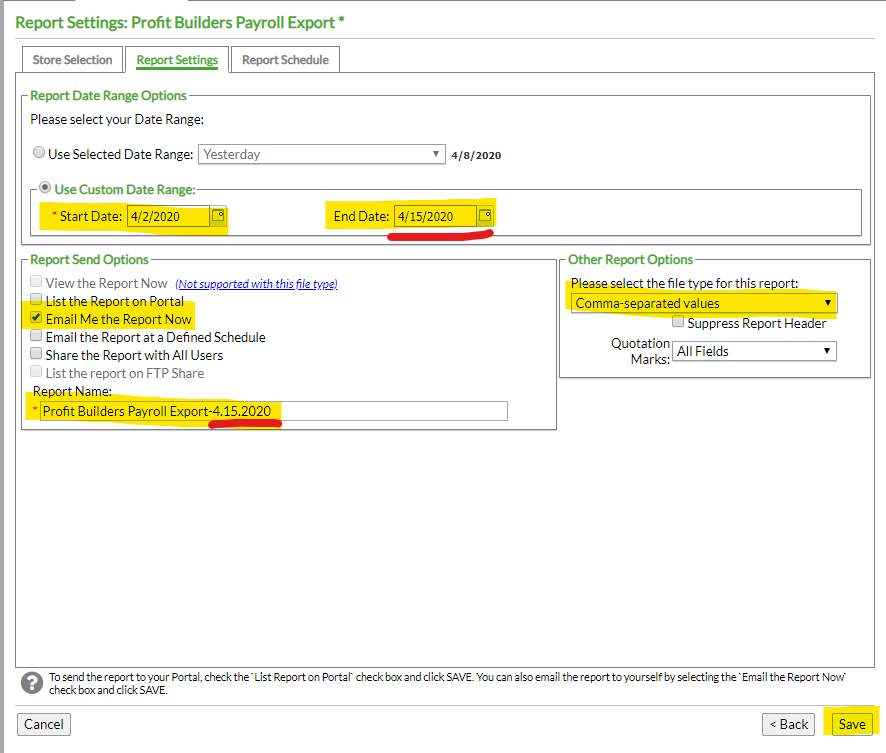 Double-check the date range covers the **pay period you are approving**, not the current calendar week. An export for the wrong period means payroll gets processed against the wrong hours.
Once all settings look correct, click **Save**. The payroll file is sent to you by email.
Forward the email **and attachment** to your Profit Builders Customer Success Manager.
Forwarding this email **is your approval** for PBI to begin processing payroll. Review the hours before you send it.
**Expected outcome:** your CSM has the CSV export for the correct pay period and can begin processing.
## Related
- [Payroll concepts](/internal/sops/accounting/payroll/payroll-concepts) — what happens to these hours once payroll is processed
- [Set up GL exports in ProWork](/internal/how-to/accounting/prowork-gl-exports) — how the resulting payroll reaches the general ledger
Double-check the date range covers the **pay period you are approving**, not the current calendar week. An export for the wrong period means payroll gets processed against the wrong hours.
Once all settings look correct, click **Save**. The payroll file is sent to you by email.
Forward the email **and attachment** to your Profit Builders Customer Success Manager.
Forwarding this email **is your approval** for PBI to begin processing payroll. Review the hours before you send it.
**Expected outcome:** your CSM has the CSV export for the correct pay period and can begin processing.
## Related
- [Payroll concepts](/internal/sops/accounting/payroll/payroll-concepts) — what happens to these hours once payroll is processed
- [Set up GL exports in ProWork](/internal/how-to/accounting/prowork-gl-exports) — how the resulting payroll reaches the general ledger