---
title: "Complete Your New Hire Onboarding in ProWork"
sidebarTitle: "Employee Onboarding"
description: "Finish all four required new hire onboarding tasks in ProWork — Form I-9, tax withholding, W-2 electronic consent, and direct deposit — in about 15 minutes."
icon: "user-plus"
keywords: ["prowork", "onboarding", "new hire", "i-9", "w-4", "withholding", "direct deposit", "w-2"]
---

> **For AI agents:** the complete documentation index is at [llms.txt](/llms.txt). Append `.md` to any page URL for its markdown version.

As a new hire, you complete your own onboarding paperwork directly in ProWork. There are four required tasks, and each one starts from the same **New Hire On-boarding** menu on your dashboard. Set aside about 15 minutes and have your identification documents and bank details on hand before you begin.

## Before You Begin

- You are logged in to your own ProWork account. Your employer sends your login credentials separately — contact your manager or HR if you have not received them.
- You have your identification documents available for Form I-9.
- You know your bank account and routing numbers for direct deposit.
- You know your ProWork password. You will be asked to re-enter it to confirm your W-2 electronic consent.

## The Four Required Tasks

| Task | What it covers | Signature required |
| --- | --- | --- |
| Form I-9 | Employment eligibility verification | Yes |
| Withholding forms | Federal W-4 and, if applicable, your state equivalent | Yes |
| W-2 electronic consent | Opting in to receive your W-2 electronically | Password confirmation |
| Direct deposit | Where your pay is deposited | No |

All four start from the same menu:
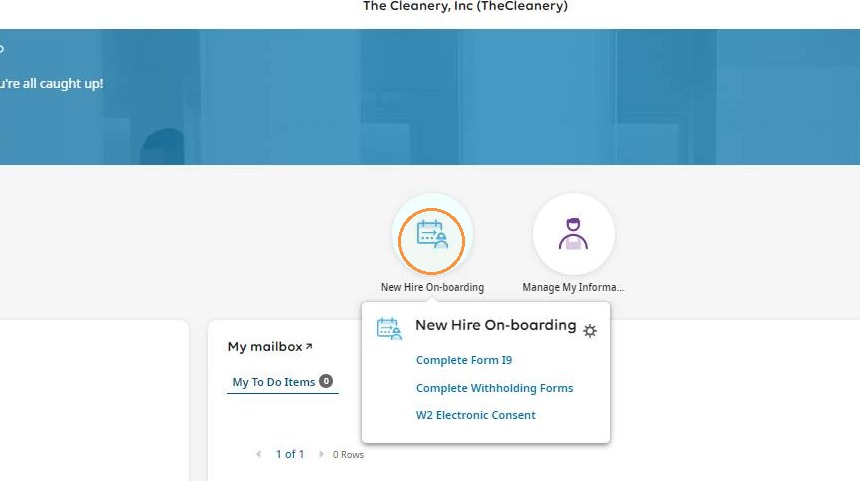
<Frame caption="The New Hire On-boarding menu on your ProWork dashboard">
  ![ProWork dashboard with the New Hire On-boarding option highlighted](https://colony-recorder.s3.amazonaws.com/files/2024-02-14/bea3a47a-29c8-4fbb-af80-869f77c9be1e/screenshot_13b01e9a760f41ed9a47d640c074bcb0_text_export.jpeg)
</Frame>

<Note>
  Every task follows the same pattern: open **New Hire On-boarding**, select the task, complete and submit the form, then use the **back** arrow to return to the menu and start the next one. You can stop after any completed task and pick up where you left off later.
</Note>

## Task 1: Complete Form I-9

<Steps>
  <Step title="Open the I-9 form">
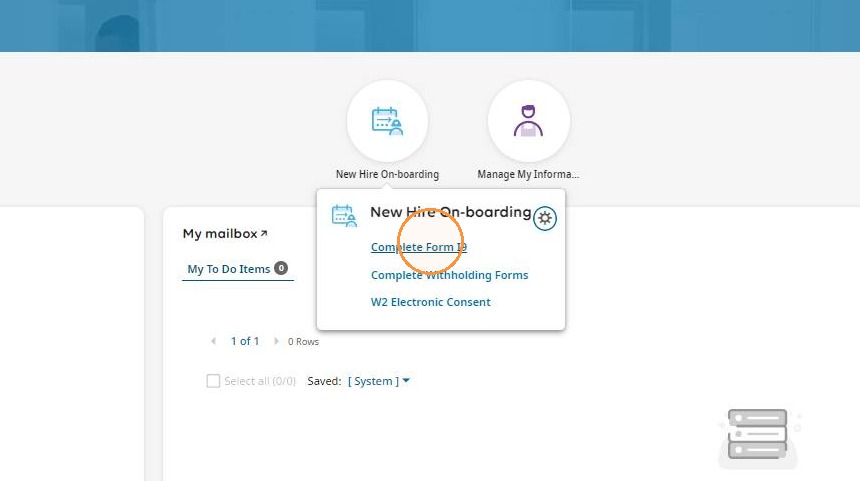
    From your dashboard, click **New Hire On-boarding**, then click **Complete Form I9**.
    <Frame>
      ![Complete Form I9 option in the onboarding menu](https://colony-recorder.s3.amazonaws.com/files/2024-02-14/94d90539-6fa4-474f-b92e-e368f1abc188/screenshot_4e0b6dac51e24251a4deed1d2fe394f7_text_export.jpeg)
    </Frame>

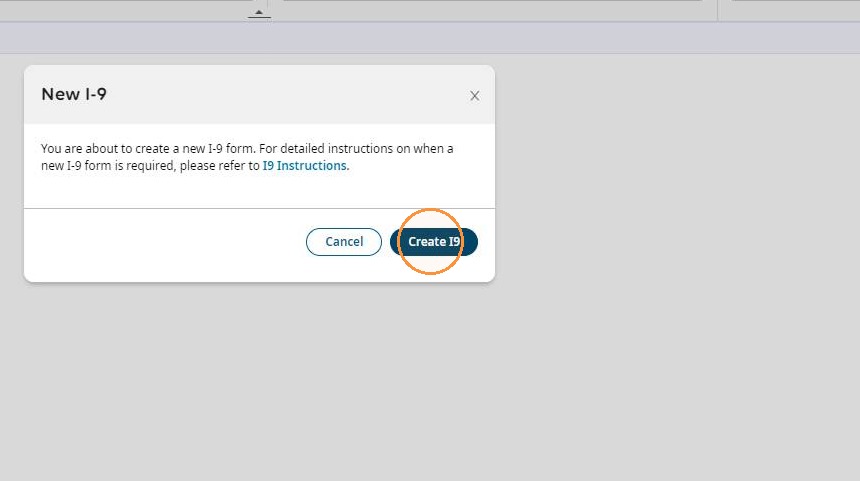
    Click **Add New**, then click **Create I9**.
    <Frame>
      ![Create I9 button](https://colony-recorder.s3.amazonaws.com/files/2023-12-05/93913445-95a9-40f2-a02b-4e6652b87b32/screenshot_4225ea283ea84fbd8d0345f1290a908e_text_export.jpeg)
    </Frame>
  </Step>
  <Step title="Fill out every field">
    Complete all information on the form.

    If a field does not apply to you — for example, **Apt Number** when you live in a house — enter `NA` rather than leaving it blank. Blank fields will stop the form from submitting.
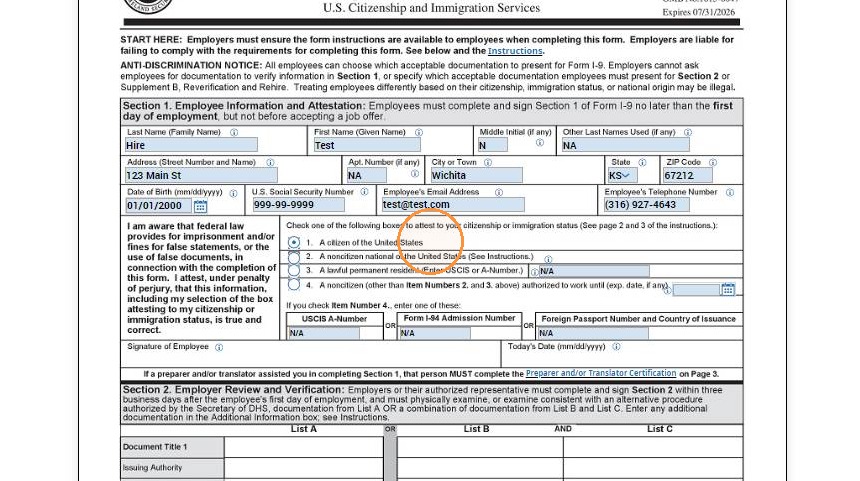
    <Frame caption="Enter NA in any field that does not apply to you">
      ![Form I-9 personal information fields](https://colony-recorder.s3.amazonaws.com/files/2023-12-05/41342c6c-2829-474f-879d-d1eff3dd5cda/screenshot_4ca43fe748c243ac9971d2220833e03c_text_export.jpeg)
    </Frame>
  </Step>
  <Step title="Submit and sign">
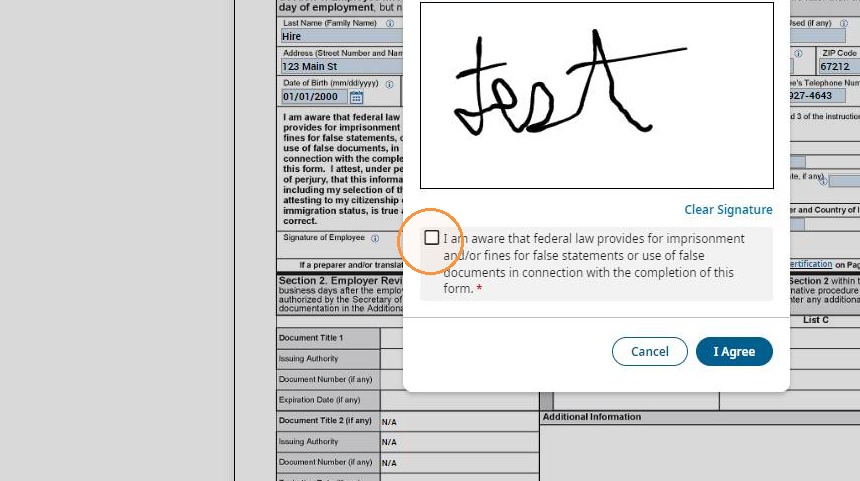
    Click **Submit I9**. Provide your signature, check the consent box, then click **I Agree**.
    <Frame>
      ![Signature field and consent checkbox on the I-9](https://colony-recorder.s3.amazonaws.com/files/2023-12-05/feae3b3f-8f2e-4551-b136-a82735fc2312/screenshot_d35e10af277a4a9aa8ec7d95a90d213c_text_export.jpeg)
    </Frame>
  </Step>
  <Step title="Return to the menu">
    Click the **back** arrow twice to return to the **New Hire On-boarding** menu.
  </Step>
</Steps>

## Task 2: Complete Your Withholding Forms

This task has two parts. Everyone completes the federal certificate. Complete the state form only if your state requires one.
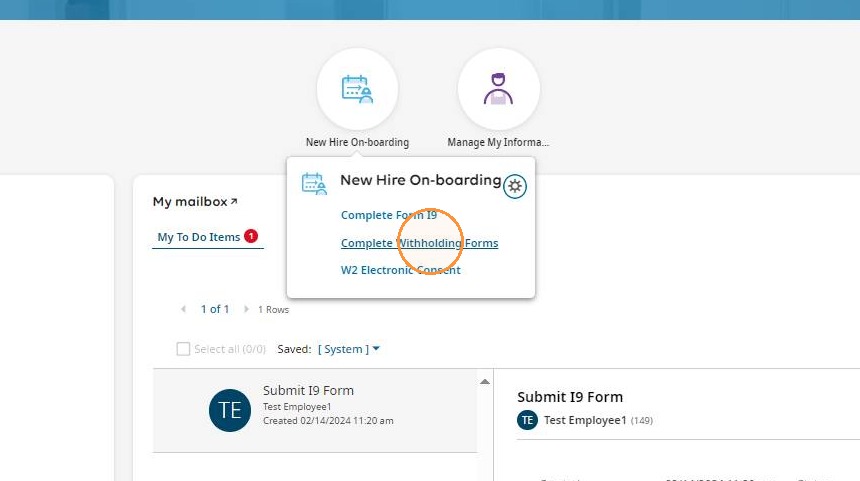
<Frame caption="Complete Withholding Forms in the onboarding menu">
  ![Complete Withholding Forms option](https://colony-recorder.s3.amazonaws.com/files/2024-02-14/bb6a8751-376c-4a23-8782-035dea343a59/screenshot_78ef489bf9b846e29dc6d679f94fc4d6_text_export.jpeg)
</Frame>

<Tabs>
  <Tab title="Federal (required)">
    <Steps>
      <Step title="Open the federal certificate">
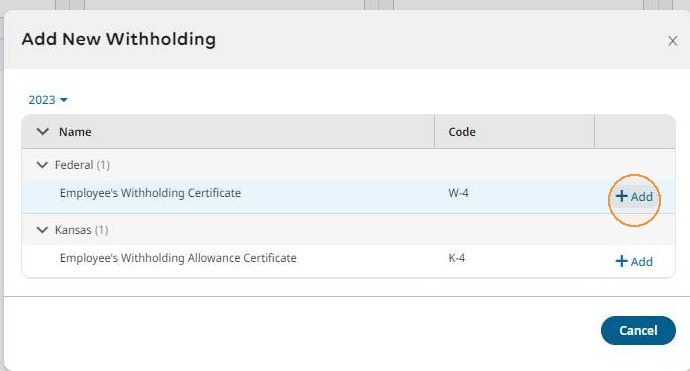
        Click **Add New**, then click **\+Add** next to **Federal Employee's Withholding Certificate**.
        <Frame>
          ![Add button next to Federal Employee's Withholding Certificate](https://colony-recorder.s3.amazonaws.com/files/2023-12-05/0c5ba19c-2000-4e9d-9ddc-84a9f78fee7b/user_cropped_screenshot_172c5a6a97fe42b588900787e564500d_text_export.jpeg)
        </Frame>
      </Step>
      <Step title="Verify your details and choose your tax settings">
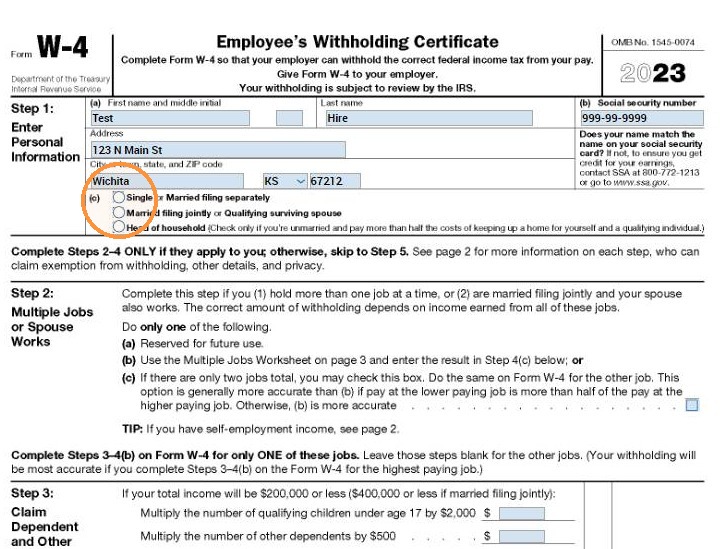
        Confirm your personal information is correct, then select your withholding settings.
        <Frame>
          ![Federal withholding certificate with personal information and tax settings](https://colony-recorder.s3.amazonaws.com/files/2023-12-05/5edcb556-3980-4b3e-b124-c91fafb3d03d/user_cropped_screenshot_ffef1e35242341c5b5f5828b0dbdd9e0_text_export.jpeg)
        </Frame>

        <Tip>
          Your withholding settings determine how much tax is deducted from each paycheck. If you are unsure what to select, the IRS Tax Withholding Estimator can help you decide. Profit Builders cannot advise you on which settings to choose.
        </Tip>
      </Step>
      <Step title="Submit and sign">
        Click **Submit**, provide your signature, then click **I Agree**. Click the **back** arrow to return.
      </Step>
    </Steps>
  </Tab>
  <Tab title="State (if applicable)">
    <Steps>
      <Step title="Add the state form">
        Click **Add New**, then click **\+Add** next to the withholding form for your state.

        If no form is listed for your state, your state does not require a separate withholding certificate and you can skip this part.

        <Frame>
          ![Add button next to a state withholding form](https://colony-recorder.s3.amazonaws.com/files/2023-12-05/76a4009b-8c5a-4e1d-9fbe-3e2deea2fa9e/user_cropped_screenshot_450c5bd0a73b4427a233b13149dc082e_text_export.jpeg)
        </Frame>
      </Step>
      <Step title="Choose your tax settings and verify your details">
        Select your state withholding settings, then confirm your personal information is correct.

        <Frame>
          ![State withholding tax settings](https://colony-recorder.s3.amazonaws.com/files/2023-12-05/f74e043b-c7b7-4b5a-9310-ea7a7239a60c/user_cropped_screenshot_a019b41280bd433da2131c1f1d6cf1ca_text_export.jpeg)
        </Frame>
      </Step>
      <Step title="Submit and sign">
        Click **Submit**, provide your signature, then click **I Agree**.
      </Step>
      <Step title="Return to the menu">
        Click the **back** arrow twice to return to the **New Hire On-boarding** menu.
      </Step>
    </Steps>
  </Tab>
</Tabs>

## Task 3: Consent to Receive Your W-2 Electronically

<Steps>
  <Step title="Open the consent form">
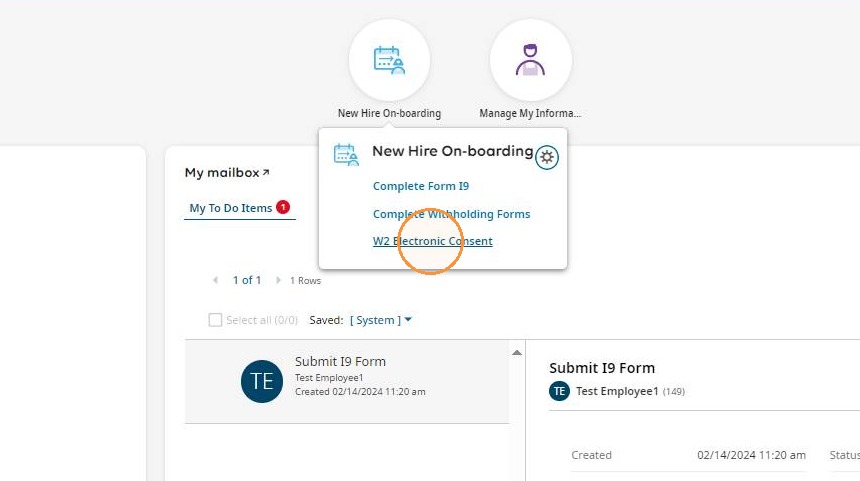
    Click **New Hire On-boarding**, then **W2 Electronic Consent**, then **Electronic Consent**.
    <Frame>
      ![W2 Electronic Consent option in the onboarding menu](https://colony-recorder.s3.amazonaws.com/files/2024-02-14/fa8a1762-7ad7-46fb-bdb9-7aee117751a5/screenshot_d81d753fb53449719d260a80a3062e0f_text_export.jpeg)
    </Frame>
  </Step>
  <Step title="Opt in">
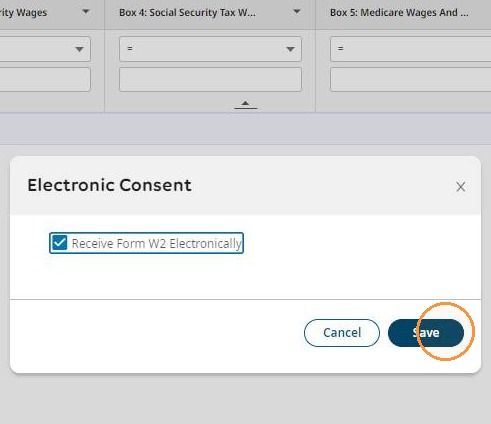
    Check the box next to **Receive Form W2 Electronically**, then click **Save**.
    <Frame>
      ![Receive Form W2 Electronically checkbox](https://colony-recorder.s3.amazonaws.com/files/2023-12-05/2c7479a7-5b99-4e1d-a47f-ca60c491301c/user_cropped_screenshot_f82cdef714f042a78f62afb23ca977c5_text_export.jpeg)
    </Frame>
  </Step>
  <Step title="Confirm with your password">
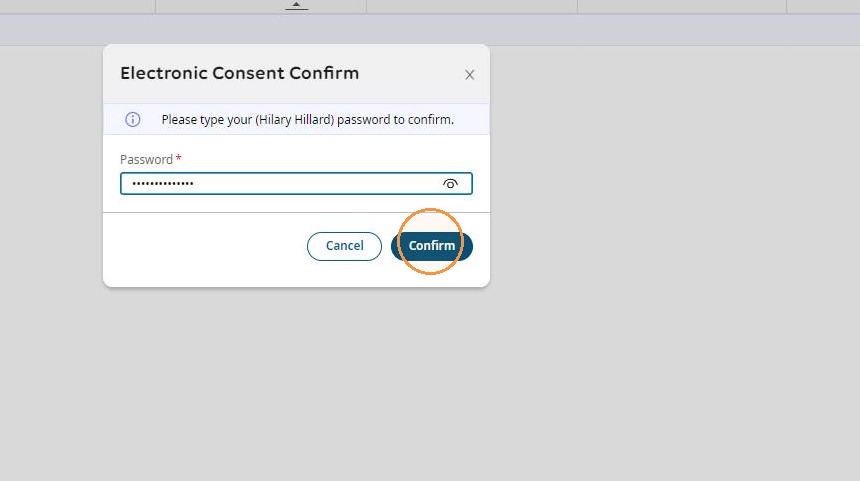
    Enter your ProWork password and click **Confirm**, then click **OK**.

    The password step is a security confirmation — it verifies that you personally authorized the change.
    <Frame>
      ![Password confirmation prompt](https://colony-recorder.s3.amazonaws.com/files/2023-12-05/34d5396d-223a-46fc-85dc-055cf2bd952e/screenshot_cb9fa05ad7a1443b8a852a73d34a02b0_text_export.jpeg)
    </Frame>
  </Step>
  <Step title="Return to the menu">
    Click the **back** arrow to return to the **New Hire On-boarding** menu.
  </Step>
</Steps>

<Note>
  Consenting here means your W-2 is delivered in ProWork instead of by mail, so you get it faster and can re-download it any time. If you would rather receive a paper copy, skip this task and leave the box unchecked.
</Note>

## Task 4: Submit Your Direct Deposit Information

<Steps>
  <Step title="Open the direct deposit form">
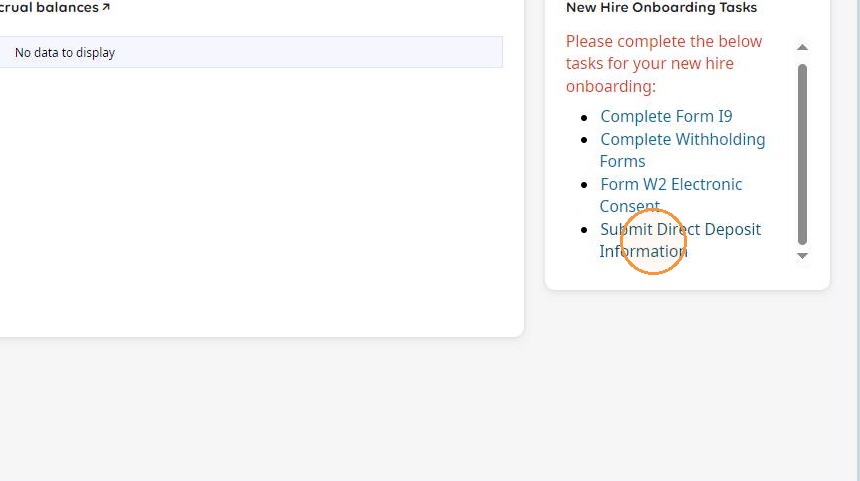
    Click **Submit Direct Deposit Information**.
    <Frame>
      ![Submit Direct Deposit Information option](https://colony-recorder.s3.amazonaws.com/files/2023-12-05/6701988b-914a-43f0-a9f6-deefdf3d0f10/screenshot_f443ddd5f5274d18954420491fead7c0_text_export.jpeg)
    </Frame>

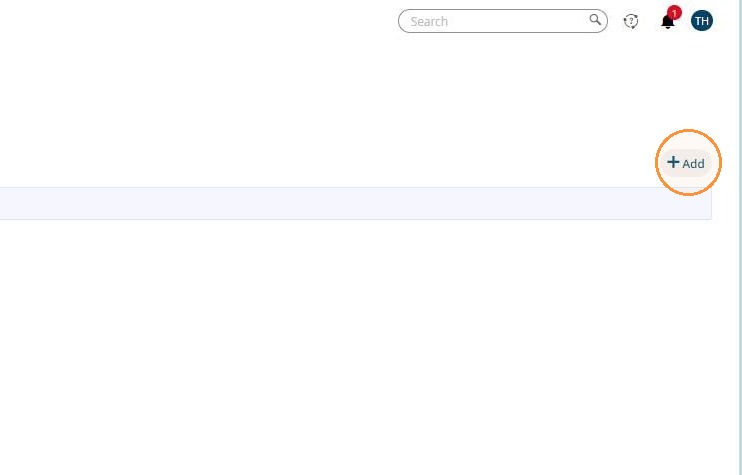
    Then click **\+Add** on the far right of the screen.
    <Frame>
      ![Add button on the direct deposit screen](https://colony-recorder.s3.amazonaws.com/files/2023-12-05/ed7de561-7a5d-4a45-a606-657931ed206d/user_cropped_screenshot_6e7a31a8b2634a42a13c26e7af6850ac_text_export.jpeg)
    </Frame>
  </Step>
  <Step title="Enter your account details">
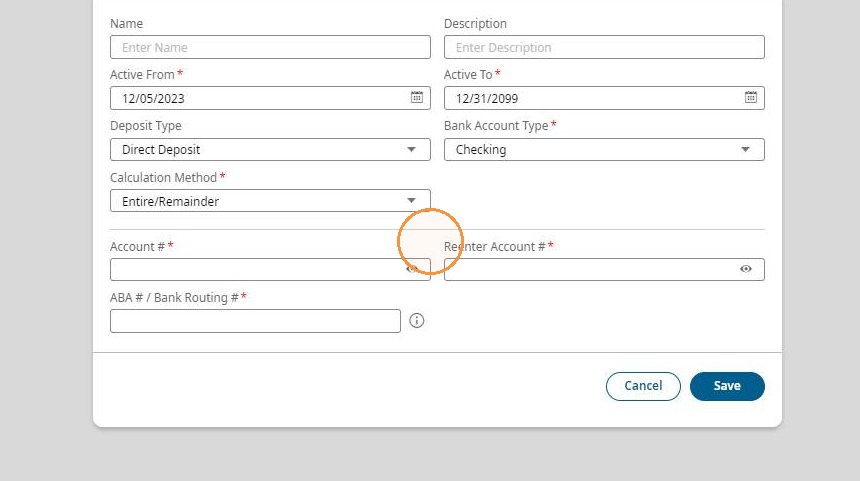
    Complete the following fields:

    - **Account #**
    - **Reenter Account #**
    - **ABA #/Bank Routing #**

    You can find both numbers on a check or in your bank's online portal. Your routing number is nine digits.
    <Frame>
      ![Direct deposit account and routing number fields](https://colony-recorder.s3.amazonaws.com/files/2023-12-05/28ee9545-c668-42b0-a0e0-87f1599e7b69/screenshot_c0254f673ab94009a5e0d62851ed8429_text_export.jpeg)
    </Frame>
  </Step>
  <Step title="Save">
    Click **Save**.
  </Step>
</Steps>

<Warning>
  Double-check your account and routing numbers before saving. Incorrect details will delay your pay while the deposit is returned and reissued.
</Warning>

## Expected Result

Once all four tasks are submitted, your onboarding documents are complete. Returning to the **New Hire On-boarding** menu shows each task as finished, and no further action is needed from you.

If a task still appears incomplete, reopen it and check for a missing signature or an unfilled field — those are the two most common reasons a form fails to submit.

## Need Help?

If you cannot log in, a form will not submit, or your onboarding tasks do not appear on your dashboard, contact your manager or your employer's HR contact. They can escalate to Profit Builders support on your behalf.